
On a recent backpacking trip, my camera was swinging around so badly that I lost the lens cap. Not to mention how sore my neck and shoulder were after hiking 12km with the camera hanging off of them. Leaving the camera inside my pack is definitely not an option: if the camera isn’t accessible, I won’t take photos – meaning that I’m lugging around a hefty camera for no reason.
So, I decided it was finally time to upgrade the way I carry my camera hiking. After a lot of research and consulting with other hikers, here are the best hiking camera clips, straps, holsters and slings, as well as some cheap DIY solutions.
1. Peak Design Capture Clip V3
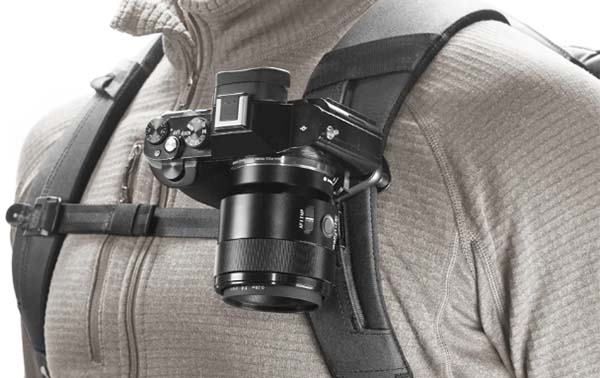
When it comes to hiking with a camera, most backpackers swear by the Peak Design Capture Clip. Unlike most other solutions, it was actually designed for serious hiking.
Here’s how it works: You open up the clip, put it on your backpack strap, close the clip, and then tighten the screws to secure it in place. Put the Peak Design plate on your camera. Then you can slide your camera in and out of the clip. It takes less than 60 seconds to install, and it’s just as easy to switch to another backpack.
The PD Capture Clip quick-release button can apparently handle over 200lbs of force. You can also rotate the release button 90° and it will lock the camera in so you won’t accidentally disengage your camera while hiking.
While the PD Capture Clip will work with any camera, it isn’t ideal for really big or heavy cameras, especially if you are using a small daypack. It will cause your pack strap to twist and there will be some swinging.
Notes: Some backpackers have reported that the screws on their Capture Clip suddenly came loose, causing their cameras to slide down the pack straps or even fall off completely! Make sure the screws are securely tightened! A few hikers recommended using LockTite Threadlocker on the screws.
Cotton Carrier recently started making a similar product. However, it doesn’t lock in place and is also a bit uncomfortable on your straps. For this reason, the Capture Clip is the better option.
Pros:
- Weighs just 5oz (142g), which is lighter than holsters and most other solutions
- Compatible with almost all Acra Swiss style tripod
- Adapters so you can use it with a GoPro or binoculars
- Keeps camera close to body – good for serious hiking and climbing
Cons:
- Not great for really large or heavy cameras
- Need to regularly check the screw tightness
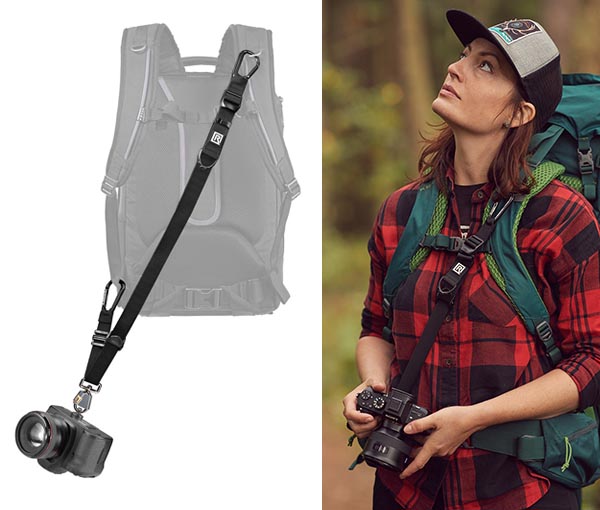
2. Spider X Belt and Backpack Holster Kit
The Spider Holster X backpack clip is a similar concept to the PD Capture Clip. It also clips to your backpack strap. The mounting plate is compatible with Acra Swiss tripods and the setup includes a GoPro adapter plate. The total setup weighs 10.8oz (307g). I’m not sure how much of that is the GoPro plate, so it will weigh less if you don’t bring that.
The difference between the two systems is that the Spider Holster has a ball-and-socket attachment method. This makes it much faster to mount/dismount your camera. However, the ball-and-socket also means that the camera will swing around a bit. Some hikers actually prefer this because the camera will swing with your movements, thus pulling less on the backpack strap. But most hikers don’t want their camera rotating around as they climb.
Because of this, I’d only recommend the Spider Holster for people doing wildlife photography (or other photography which requires very quick access) and who also aren’t doing serious climbing.
Pros:
- Very quick to get camera on/off
- Comes with GoPro adapter plate
- Quickly switch between belt and strap carry
Cons:
- Camera swivels in the mount a bit as you hike
- Best for cameras under 3lbs
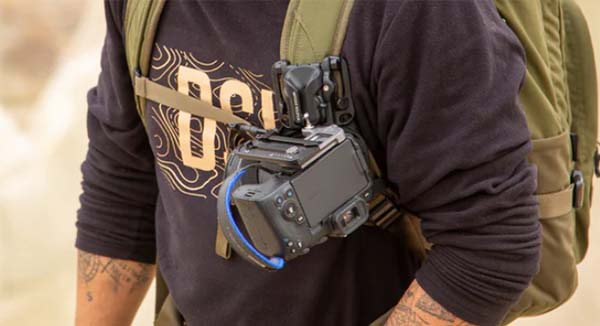
3. BlackRapid Backpack Camera Sling
If you prefer to carry your camera down at your side while hiking, the BlackRapid backpack camera sling is a good option. It is basically a camera strap with carabiners so you can attach it to your backpack straps. Since the strap doesn’t go over your neck, there’s no rubbing or neck pain.
There will still definitely be some camera swinging if you are doing serious hiking or climbing, but the setup allows you to access your camera quickly. The strap is also very secure so you don’t have to worry about dropping your camera. It’s also impossible to have any “user failure” like you might have with a clip system.
Pros:
- Quick camera access
- Idiot proof – no chance of camera falling
Cons:
- Camera swings around – not for climbing
- You’ll have to unscrew the mount if you use a tripod
4. Camera Chest and Shoulder Harnesses
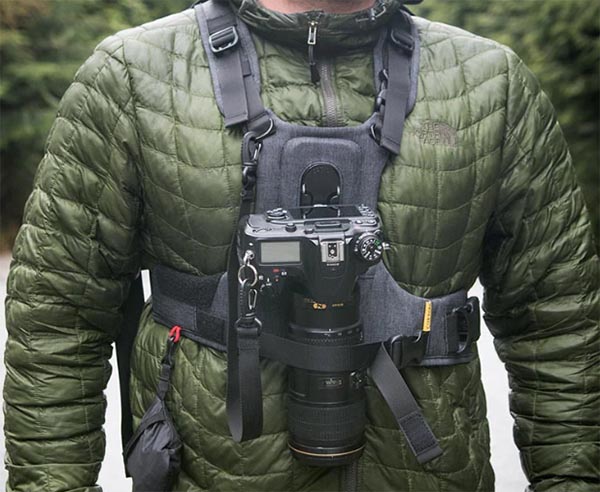
I personally don’t like camera harnesses for hiking. The main issue is that they need to be worn over your body. If you need to adjust your layers while hiking, then you are pretty much screwed (wear the harness over your base layer and you won’t be able to put on a jacket; wear it over your jacket and you won’t be able to take it off easily!).
In addition to this problem, a harness means you’ve got an extra set of straps to deal with. It gets uncomfortable and bulky to wear a chest harness under your pack. The neck camera harnesses are less bulky, but they can rub against your neck.
Despite this, a harness might be the best solution for hiking with really large, heavy cameras. A lot of serious photographers wear by them for carrying their cameras when hiking.
Lots of hikers recommend Cotton Carrier harnesses. They have a lot of good ones to choose from.
Pros:
- One of the best ways to carry really large, heavy cameras
- Keeps camera secure when climbing
- Some solutions let you carry multiple cameras at once
Cons:
- Big and bulky
- Makes it difficult to adjust your layers
5. Camera Holster/Bag Attached to Pack Straps
If you are really worried about your camera taking a beating while hiking, or it is bad weather, this is your best solution. You simply attach the camera holster to your backpack straps instead of wearing it around your neck. You can use quick connectors or carabiners.
Leave the holster unzipped and you’ll have quick access to your camera. But, if you are leaving it unzipped, you’ll want to wear the camera strap around your neck as a precaution. Since the holster is supported by the backpack, the camera strap doesn’t dig into your neck.
Obviously, this setup is pretty bulky. The holster can end up swinging around a lot. If it is too low (or you’ve got a massive camera), then it can restrict movement as you hike.
Pros:
- Protects camera from damage and bad weather
- Can hold other photo gear too
Cons:
- Big and bulky
6. Quick Connectors Attached to Your Pack
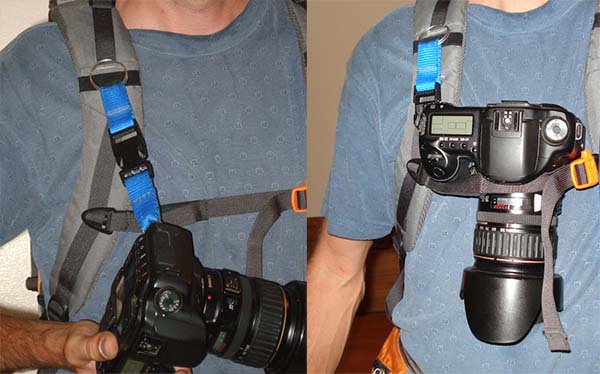
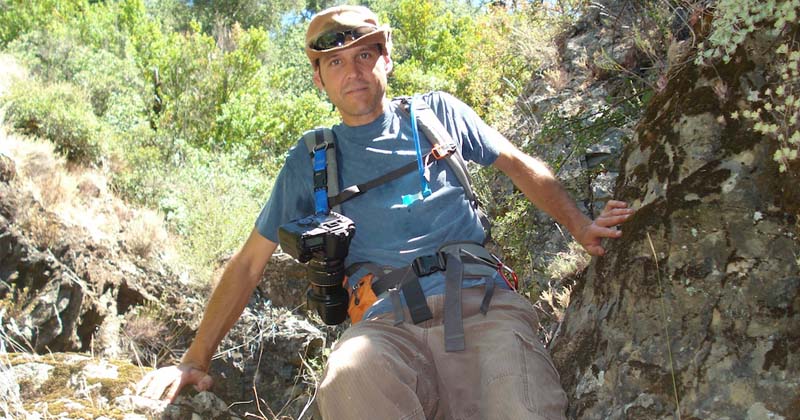
An incredibly cheap solution for carrying your camera hiking is to use two quick connector straps. Attach one side of each strap to your camera and the other side to your backpack (either to the lift-loader straps or sternum-strap connection points)
There are two main pitfalls to this setup. First, you have to use reliable connectors (these ones are good). Otherwise you might have the cheap plastic fail on you. A simple fix is to still wear a neck strap as a backup: since the quick connectors are holding the camera, the strap doesn’t actually dig into your neck.
The second pitfall is that “quick release” isn’t always quick release. It can be difficult to unbuckle the connectors quickly, and annoying to buckle them back in place. Some quick connector buckles are really small, so it’s hard to use with gloved hands.
In the photos above, you can see how the hiker used a thicker buckle strap to attach his camera. Since he only used one strap, he doesn’t have to unclip anything to access it – but there’s a lot of swinging (I personally would use two straps – one for each side!). When not in use, he puts the sternum strap over the lens to secure it in place. Not exactly comfortable but gets the job done. 🙂
Pros:
- Cheap solution
- Keeps camera mounted high and in middle of chest – good for climbing
Cons:
- Connectors might fail
- Slightly annoying to take camera on/off
7. DIY Hiking Camera Strap from Paracord
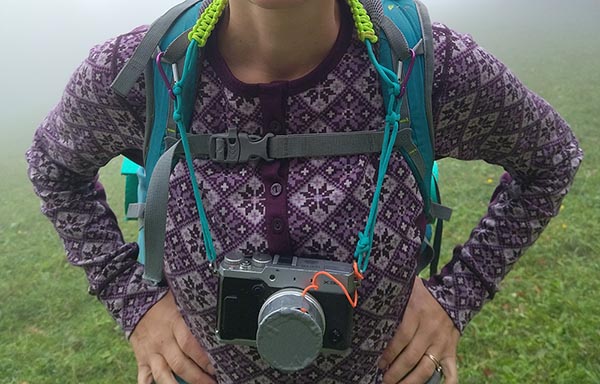
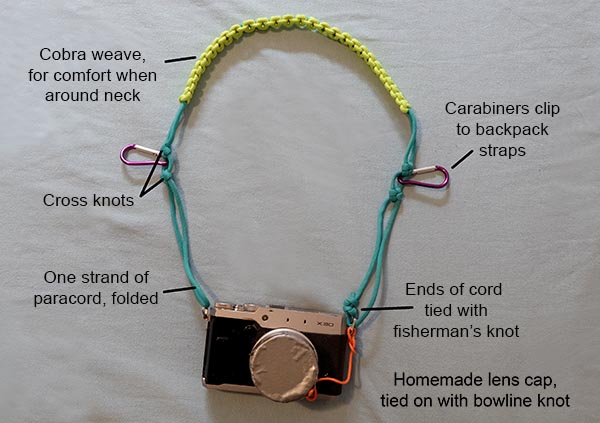
While waiting for my PD Capture Clip to arrive in the mail, I made myself this camera strap out of paracord and some carabiners. It worked surprisingly well on hikes.
I wear the strap around my neck. But there are two carabiners which I attach to my pack’s straps. This setup keeps the strap from digging into my neck. The camera is also stable in the middle of my chest, so it wasn’t swinging around and worked great for hiking.
If I want to wear it as a normal strap (not connected to my backpack), it’s still fairly comfortable because the “cobra knot weave” has a nice rounded edge to it.
It did take a bit of time to unclip the carabiners, so it’s not ideal for wildlife photography. But, considering that the DIY strap cost less than a $3 to make, I’m quite happy with it. Plus, I love how dorky it is :p
Notes:
- I later added a few more knots to the strap. This allows me to put the carabiners in different positions so I can adjust the height of the camera on my chest.
- You could also use a sliding knot (like a tautline hitch) on the ends which attach to the camera. This would allow you to quickly adjust the length of the strap.
- The lens cap is made from the lid of a plastic toothpick container which I covered with duct tape. I did order a new lens cap, but this works well in the meantime 😀
How do you carry your camera hiking? Let us know in the comments section below!
Image credits:
“DIY Hiking Strap: Stowed” (CC BY-NC 2.0) by treeswing
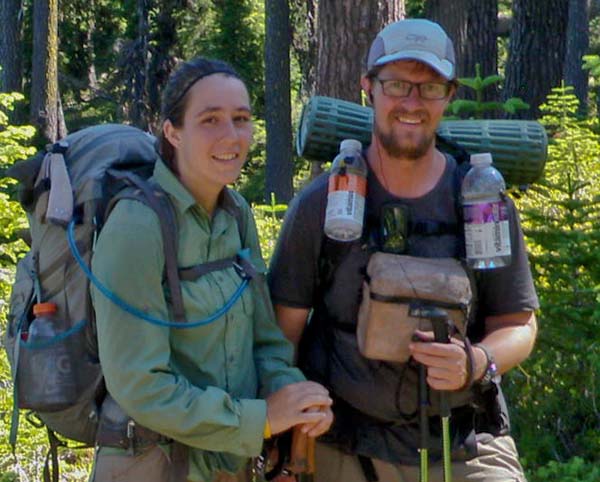
“Pacific Crest Trail Through Hikers” (CC BY-NC 2.0) by ex_magician
“DIY Hiking Strap: In Action” (CC BY-NC 2.0) by treeswing
“DIY Hiking Strap: At Rest” (CC BY-NC 2.0) by treeswing
Sources:
https://www.reddit.com/r/photography/comments/d6prvj/hiking_photographers_what_do_you_use_to_carry/
https://www.reddit.com/r/Ultralight/comments/8bdua7/alternatives_to_peak_design_capture_clip/


2 Comments
Kate
August 23, 2023 at 11:33 pmHey! How did you attach the quick connector to the camera? Going backpacking soon and trying to find a way to hold my camera in place and this seems like the best option for me but just dont know how you connected the strap up to the camera/unclear to see in pic. 🙂
Diane
August 26, 2023 at 7:48 amAre you talking about solution #6? In that case, you need quick connectors which have clips that can go on the backpack straps, like the OP/TEC ones. For connecting them to the camera, there are two options: 1) if the camera’s strap holder has keychain style rings on it, then you can slip the quick connector loop end onto the ring. 2) Put the quick connector loop end partially through the rings and then insert the clip end through the loop. Damn, that’s hard to explain. But it’s the first step of a “prusik knot”. 🙂