
Freeze-dried meals are awesome for backpacking and camping. They are lightweight, cook quickly, and have a long shelf life. The only problem is that commercial freeze-dried meals can be really expensive. A way around this is to buy bulk freeze dried foods and assemble your own trail meals.
Jump to:
- How to make your own freeze-dried meals
- Calculating calories and nutrients
- Shelf life and packaging methods
- Where to buy bulk freeze-dried foods
- Combining freeze-dried and dehydrated ingredients
Interested in dehydrating your own backpacking meals?
Get my recipes eBook. It has over 50 ultra-light, healthy meals plus tons of info on backpacking nutrition and meal planning.
Learn more here.
How to Make Your Own Freeze Dried Meals
Step 1: Choose Your Carb
This will be the base of your meal. Think pasta, instant mashed potatoes, couscous, rice noodles, ramen, polenta…
Step 2: Add Protein
Most commercial freeze-dried backpacking meals suck in terms of protein. One of the benefits of going the DIY approach is that you can really load up on the protein.
You can get bulk containers of freeze-dried meat. They aren’t cheap though. If you want to save money or are vegan, then consider freeze-dried beans instead. TVP (though not freeze-dried) is also a good cheap protein option.
Step 3: Add Veggies and Fruits
This is where making your own freeze-dried meals really pays off. You can omit any veggies that you hate and put in the veggies you actually like.
Don’t skimp on the fruits and veggies! I know that they don’t have a lot of calories per weight, but they are crucial for antioxidants and vitamins. How are you supposed to recover from a long day of hiking if you don’t have nutrients???
Step 4: Add Healthy Fat
Without fat, your meals will taste boring and you won’t feel satiated. Ideally, about 50% of your calories should come from fat.
What fat to add to your DIY meals?
- Cheese powder: Most store-bought backpacking meals are loaded with freeze-dried cheese or dairy. It’s kind of hard for a meal to taste bad whe it is covered in cheese! To replicate this, just buy freeze-dried cheese powder in bulk. You can buy freeze-dried cheese powder in bulk.
- Olive oil: Bring a bottle of olive oil with you on the trail. Olive oil has a great calorie/weight ratio and is almost pure fat. Add it to meals after they rehdyrate.
- Nuts and seeds: Preferably in nut/seed butter form as your body will absorb it better. Here are some backpacking meal ideas with peanut butter.
Step 5: Add Flavor
Now choose flavors like herbs and spices. The more flavor you add, the less salt you will need. Note that your sense of taste changes at high altitudes so you’ll probably need more salt and flavoring than you normally would.
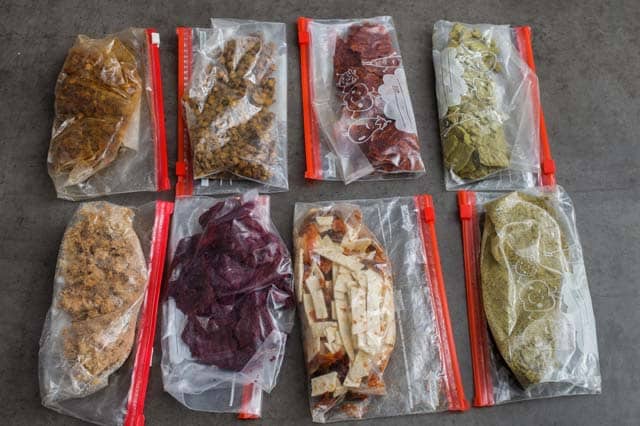
Packing Meals for the Trail
You’ve got two options for packaging your meals: in one bag or in two bags.
All In One Bag:
As a general rule, ingredients for soups and stews can be packaged together in one baggie. When it’s time eat, just dump all the ingredients in your pot and cook until rehydrated.
Likewise, if all of your foods take a similar time to cook/rehydrate, then you can package them all in one baggie. For example, instant rice with freeze dried beans and veggies should be fine all in one baggie.
Two Bags:
Some ingredients may have shorter rehydrating times than others. Because of this, you may need to package ingredients separately. Otherwise, some ingredients may burn to the pot, or will turn to mush.
For example: Instant mashed potato flakes cook very quickly. If you were to mix all your bulk freeze-dried ingredients in with the flakes, you’d end up with crunchy bits in the potatoes. Yuck!
Because of this, you should:
- Package the quick-cook and longer-cooking ingredients separately.
- Put the longer-cooking ingredients into the pot first. Cook until rehydrated.
- Add the quick-cook ingredients to the pot, adding more water if necessary. Cook until done.
Keep Cheese Powder Separate
With few exceptions, it’s best to package cheese powder separately. Wait until all the other ingredients are fully cooked/rehydrated. Then add the cheese powder, along with a bit more water if necessary. Trying to cook with the cheese powder already mixed in will cause everything to stick or burn to the pot!
Tips for Making Your Own Freeze-Dried Meals
Start with Breakfast
If you aren’t sure how to get started with DIY backpacking meals, start with breakfast. Those bags of Mountain House oatmeal are really expensive (especially considering how cheap oats are!). You are paying a premium price for what essential is some oats and a few freeze-dried fruits in fancy packaging.
To make your own, just combine some freeze-dried fruits with oats, nuts, and some sugar. You can also add freeze-dried milk powder to make it creamier. I like to add superfoods like chia seeds to my trail oatmeal too.
Choose “Wet” Meals
Avoid dry meals like scrambled eggs with freeze-dried veggies. Why? Because you can end up with soggy eggs if you accidentally add too much water (gross!). Or the eggs will rehydrate before the veggies, leaving you with crunchy bits. You are also more likely to burn your pot while rehydrating dry meals.
Instead, opt for “wet” meals. They are much more forgiving!
Try:
- Stews
- Hearty soups
- Chili
- Lentils or beans with rice in sauce
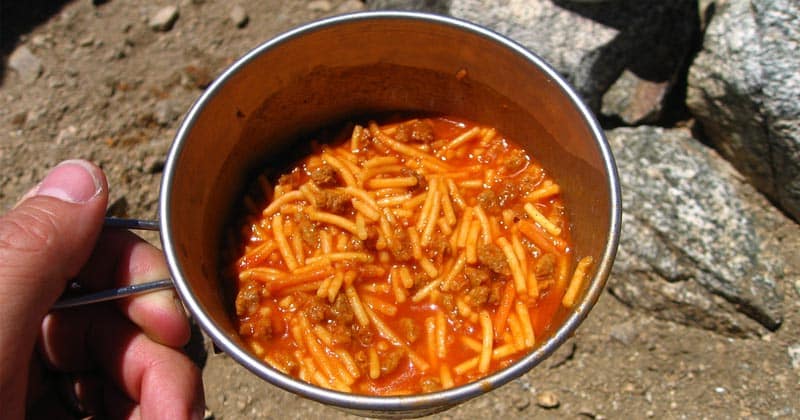
Pasta Is Also Easy
For DIY backpacking pasta:
- At home:
- Pack pasta + freeze-dried protein and veggies in one baggie
- Pack freeze-dried sauce ingredients (such as cheese powder or tomato powder) in another baggie.
- On the Trail:
- Presoak the pasta bag contents. This cuts down on cooking time (saves fuel!) and helps you see how much water you really need.
- Cook the pasta.
- Make sure there’s a bit of water left in the pot.
- Remove pot from stove.
- Add sauce bag contents. Mix and wait 5 minutes.
Steal Ideas from Backpacking Meal Brands
An easy way to come up with meal ideas is this: Look at what the backpacking meal companies offer. Then just replicate them, with some more of your favorite spices or ingredients added in.
Calculating Calories and Nutrients
Most backpackers and thru-hikers I know focus solely on calories when doing their meal planning. Hence why Pringles are so damn popular as a trail food!
I’d encourage you to think beyond calories. Without protein and fiber, all those calories will rush into your bloodstream too quickly. This will cause your blood sugar to skyrocket, and subsequently crash. And when it crashes, you will feel tired and very hungry.
There isn’t too much research on thru-hiking nutrition. Most macronutrient recommendations are based on Brenda L. Braaten’s info. She recommends:
- 50% fat
- 35% carbs
- 15% protein (you’ll need about 0.8 to 1g of protein per kilogram of bodyweight)
But don’t forget about micronutrients too. Fruits and vegetables might not deliver much in terms of calories/ounce, but they are crucial for muscle repair, immune response, and mental clarity.
If you really can’t be bothered to get 6 servings each of fruits and veggies into your backpacking meals, at least carry a veggie-based supplement powder.
Shelf-Life of DIY Freeze Dried Meals
The freeze-dried meals you buy can last for years…until you open them. Once the package is open, the shelf life shrinks drastically. Some companies recommend eating opened packages of freeze-dried foods within 1-3 weeks!
So long as you keep the contents of your DIY meals dry (which also means out of humidity), they should still last for months. But any amount of humidity can drastically shorten shelf life. Something to think about if you are mail-dropping yourself food to a humid area!
Storage Bags for DIY Trail Meals
Backpacking meals like those from Mountain House are in foil-lined bags. These are sealed to keep out oxygen and humidity. However, you can probably get by with using regular zip bags for packaging your DIY meals.
For longer trips, or high-humidity situations, you’ll want to seal your meals. Consider getting a vacuum sealer like this one. Alternatively, you can get foil-lined Ziplock bags. They aren’t air-tight, but should be okay for most trips of 4+ weeks.
*Many hikers like to put each meal in its own pouch. This makes it easy to portion out meals and prevents you from overeating. But you can also store your meals in bulk and just measure them out before preparing on the trail.
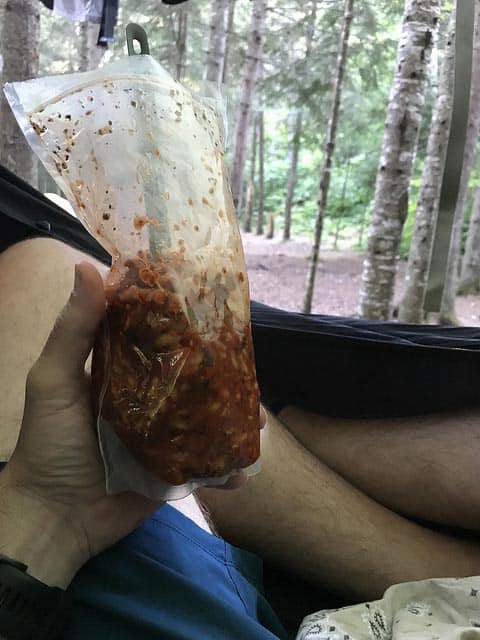
Just add water and you can prepare your meal inside the foil-lined zip bag.
Where to Buy Freeze-Dried Foods in Bulk
There are a lot of brands which offer freeze-dried foods in bulk containers. Your best option is to shop at Amazon. They have all the major brands, often have sales and you’ll save money on shipping. See bulk freeze dried foods at Amazon here.
Below are some other brands and places where you can buy bulk freeze dried foods for your DIY backpacking meals.
Bulk Freeze-Dried Meat
*Note that many companies put fillers like flour in their freeze-dried meat. These options are for 100% meat without fillers.
- The Ready Store: They have a big selection of freeze-dried meats including beef, chicken, sausage, turkey, and bacon.
- Valley Food Storage: They have chicken, beef, sausage and lots of freeze-dried cheese too.
- Augason Farms: Chicken, beef, and variety packs available
- Nutristore: Available on Amazon, they have chicken and beef in bulk.
- Mountain House: They have chicken and beef cans.
Freeze-Dried Vegetarian Proteins
You are pretty limited here. Most products are dehydrated and not freeze-dried. It’s pretty easy to dehydrate your own beans though.
- Valley Food Storage: They have freeze-dried peanut butter, cheese, and some other vegetarian proteins.
- Augason Farms: Freeze-dried peanut butter, taco mix, black bean burger mix, “bacon” bits, egg powder, and variety packs.
Bulk Freeze-Dried Fruits and Veggies
Unfortunately, there aren’t too many options when it comes to freeze dried veggies. For this reason, you might need to combine some dehydrated ingredients with your freeze-dried bulk ingredients. It will take some experimentation to get the ratios and cook times right. But, I think it is worth it in the long run – you’ll save money on backpacking meals plus be able to customize them for your nutritional and taste needs. 🙂
*I love mushrooms, but they are really difficult to rehydrate. They almost always end up chewy. So keep that in mind if you try to make trail meals with freeze dried mushrooms.
- Augason Farms: They have the most options when it comes to bulk freeze-dried fruits and veggies.
- The Ready Store: They also have a good selection which includes fruit and veggie buckets that include a variety of different products.
- Mother Earth
 : Has freeze-dried berries, bananas, broccoli, and some other fruits
 - Karen’s Naturals Freeze Dried variety pack (fruits)
Bulk Freeze-Dried Sauces and Cheese
- Augason Farms: Four different freeze-dried cheeses
- The Ready Store: Three different cheeses and lots of other freeze-dried dairy products (like butter) too
- Backpacker’s Pantry freeze dried whole milk
- Nutristore freeze dried cheddar
Combining Dehydrated and Freeze-Dried Ingredients
Even with the DIY approach, freeze-dried foods are expensive and you don’t have too many options.
For this reason, I dehydrate my own meals instead. It’s also possible to combine dehydrated and freeze-dried foods in the same meal.
Some things to keep in mind when combining dehydrated and freeze-dried ingredients:
- Dehydrated foods contain moisture. If you mix them with your freeze-dried foods, some moisture will get into the freeze-dried ingredients. This will reduce shelf life.
- Rehydration times may vary. If you boil all the ingredients together, some ingredients might end up mushy. So, you will likely need to package meal ingredients in two baggies.
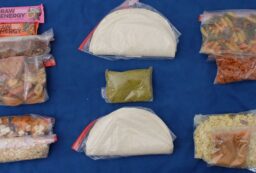
Below are some of the dehydrator meals I’ve made. You can find all of these in my Trail Recipes eBook. Buy it here.
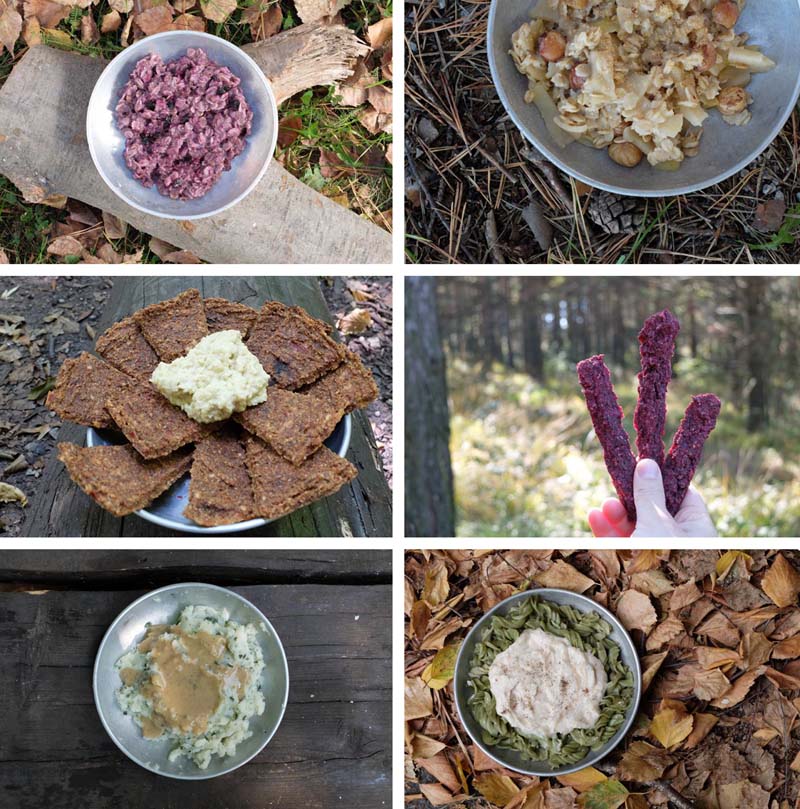
From left to right: Blueberry chia oatmeal, pear cardamom ginger oatmeal, red pepper crackers with hummus, beetroot “salami”, mashed potatoes with white bean gravy, & pasta with buttery white bean sauce
Here’s what the dehydrator meals look like packed. These have a total of 13,700 calories and only weigh 6.9lbs dry. Just add water to rehydrate!
Because you made it to the end of this post, I’ll even give you 50% off.
Buy the eBook here for 50% off.
Do you make your own backpacking meals with freeze-dried ingredients? What’s your favorite recipe? Let us know in the comments.
Resources for this article include:
http://www.marathonguide.com/training/articles/Nutrition.cfm
https://www.msrgear.com/blog/nutrition-for-thru-hikers-part-1-food-for-fuel/
https://thru-hiker.com/articles/PackLightEatRight/protein.htm
https://blackwoodspress.com/blog/21416/high-protein-hiking-foods/
Image credits:


10 Comments
Dael
May 21, 2019 at 1:58 amThese are great for backpacking and super cheap if you buy the bulk box:
https://www.butlerfoods.com/soycurls.html
I add these to Dr. McDougall’s meal cups. I aim for 500 calories per meal so I’ll use two cups if it’s low-calorie. All I need to do is add boiling water.
SIL Hiker
August 1, 2020 at 4:20 pmOK, some people are going to think I’m crazy, but here goes. I make my own version of “Mountain House Biscuits and Gravy”. It goes like this….. I buy freeze dried sausage crumbles, powdered sausage gravy, and frozen biscuits. I bake the biscuits, crumble them up, dry them in a dehydrator. I put the sausage and gravy powder in the freezer bag or mylar bag, then put the dried biscuit chunks in a separate baggie and place it inside the first bag and seal it. When I’m ready to use it, I add the appropriate amount of water to the gravy/sausage mix, stir it up, wait 5 minutes, then dump in the biscuits , stir gently, wait another minute or two and eat. If you wait too long, the biscuits get soggy. You can make this in any portion/proportion you like.
Diane
August 4, 2020 at 12:16 pmI don’t think you are going crazy. That sounds delicious 🙂 Though I would reduce the work and just use instant mashed potato powder instead of biscuits (the potatoes you can make by just pouring water over it — even cold water if you don’t feel like cooking). You’d just need to let the sausage and gravy powder cook or soak a bit and then do the potatoes.
Jeremy Thompson-Astilla
March 14, 2022 at 7:03 pmWhere are the recipes? Or am I just missing them? Your title seem to indicate that you were going to give some recipes that would be helpful for freeze dried meals. Any suggestions on where I can locate those?
Diane
March 14, 2022 at 10:39 pmIt’s more of a how-to. Just follow the “how to assemble” steps and you can make dozens of meals. For example: Instant rice + freeze dried beans + freeze dried red peppers and onions + tons of spices + freeze dried cheese powder.
Or you can just literally read the ingredients on any brand of freeze dried backpacking meals – like Mountain House – and recreate it. Their beef strogonoff is basically noodles, freeze dried beef, freeze dried mushrooms and sour cream + milk powder plus lots of chemical flavoring.
Lee
March 29, 2022 at 7:48 amI’d highly recommend buying (or going in with a like-minded pal) a freeze dryer – especially if you want to totally custom-design your own meals from scratch. Not cheap but neither is buying tons of pre-made freeze-dried food over years that may or may not meet your exact needs/wants. Also see my delicious recipe for vegan quinoa salad:
1 cup organic quinoa
1 cup kale and romaine lettuce
1 12 ounce steak
Cook steak. Throw quinoa and kale/lettuce in garbage. Eat steak.
Diane
March 29, 2022 at 2:44 pmIt would have to be a good friend to share the freeze dryer. They require maintenance, so you’d have to share that chore. They are also heavy AF, so it would likely only live at one person’s home. Hopefully, it would be at my home 🙂
Lynn
July 4, 2022 at 4:15 pmI’m putting together meals from individual freeze dried ingredients that I’ve freeze dried myself. Do I have to first cook elbow noodles (gluten free brown rice) then freeze dry them. Or can I just add them raw to my other freeze dried ingredients in my meal??
Diane
July 5, 2022 at 9:15 amYou should do one of these:
-Cook the noodles and then freeze-dry. Then you could add them to the other freeze-dried ingredients. They might end up mushy when you rehydrate them, but it will be a LOT faster than cooking raw noodles.
OR
-Keep raw noodles in a separate baggie from your other ingredients. On the trail, cook the noodles. When they are al dente, drain most of the water (leave enough to rehydrate your freeze-dried ingredients), add the freeze-dried ingredients, cover and let sit for 3-15 minutes (depends on what you are adding).
The second method is slightly more complex, but the pasta texture ends up being a lot better – especially since GF noodles tend to get a bit soggy anyway. If you freeze-dry cooked rice though, I’d just add it with the other ingredients and rehydrate all together. You won’t mind if rice ends up a bit mushy.
Teresa
February 20, 2023 at 1:34 amDehydrated mushrooms are gross but dehydrated, powdered mushrooms are awesome. Add them to all sorts of stuff to add flavor and vitamins. Add it to the proportioned meal or bring a baggie of it with. Mushrooms have a lot of water, keep that in mind when you put a teaspoon of powder in.