Tent floors, especially made from UL materials like Silnylon, are very slippery. Add a slippery inflatable pad and a slippery sleeping bag on top of this and you are bound to slide around in the tent. There are a lot of ways you can keep your sleeping bag put though, even if you are camped on an incline. Here are the best methods.
Also: If the pad’s staying put but you are rolling off it, then see these ways to keep kids on their sleeping pads.
1. Use a Pad with a Non-Slip Coating
Some sleeping pads have a non-slip coating to prevent sliding. For example, the Exped Ultra 5R is non-slip on both sides.
Therm-a-Rest also used to make a non-slip spray that you could put on your pads. They don’t sell it anymore but you could probably make your own using contact cement. Or use Super Grip. Just put a thin layer of contact cement on your pad. Don’t put too much or debris will stick to it!
2. Create Texture
A lot of backpackers put little blobs of SeamGrip on their pad and/or tent floor. The texture from the blobs creates some friction so the pad won’t slide on the floor.
The problem with this approach is that the textured blobs can gather dirt. A lot of people recommend to use streaks instead of dots; the streaks don’t gather as much dirt. They also seem to stay on better than dots, which often peel off.
Instead of SeamGrip you can also use:
- Silicone: Works well on Silnylon but not so well on sleeping pads. To use, you’ll need to thin it down with a bit of paint thinner first. Or use “flowable windshield sealant”.
- Goops: Such as Shoe Goo and MarineGoop. They work well on most sleeping pads but not on Silnylon.
Instructions:
- Start with a clean pad and tent floor. Wash with soap and water if necessary and let it dry.
- Make zig-zag streaks of SeamGrip or goop down your sleeping pad. The streaks should be thin.
- Make zig-zag streaks of SeamGrip or thinned silicone across the tent floor.
- Put some extra streaks in the areas where your hips will be. This is where most of your weight is and slippage is likely to occur.
- Let the SeamGrip dry for at least 24 hours.
3. Put Thin Foam Under Pad
Instead of putting SeamGrip all over your pad and tent floor, just put a very thin foam pad under you main pad. It not only prevents slipping but also helps extend the life of your pad.
There are a few backpacking brands which sell 1/8” EVA foam pads for this purpose. If you want a cheaper and lighter solution, just use non-adhesive shelf liner. You don’t even need to put it under your entire pad. Just put a 12×12” square under your hip area and that should do the trick.
4. Sleeping Bag with Pad Sleeve
If your sleeping bag is also sliding off the pad (or you roll around a lot at night!), then consider a pad sleeve. I just wish more brands had this feature on their bags. Big Agnes is one of the few quality brands that has pad sleeves.
5. Use Hooks or Straps
Instead of getting a sleeping bag with a sleeve, you can attach your sleeping bag to the pad using straps or hooks like the Sea to Summit quick-release straps.
Most sleeping bags don’t have pad loops though, so you will probably have to sew loops on. It can be annoying to connect them every night and the straps add some weight, so this isn’t a great solution for thru-hiking, bike touring, or anytime you switch campsites frequently.
6. Sleep the Right Direction on Slopes
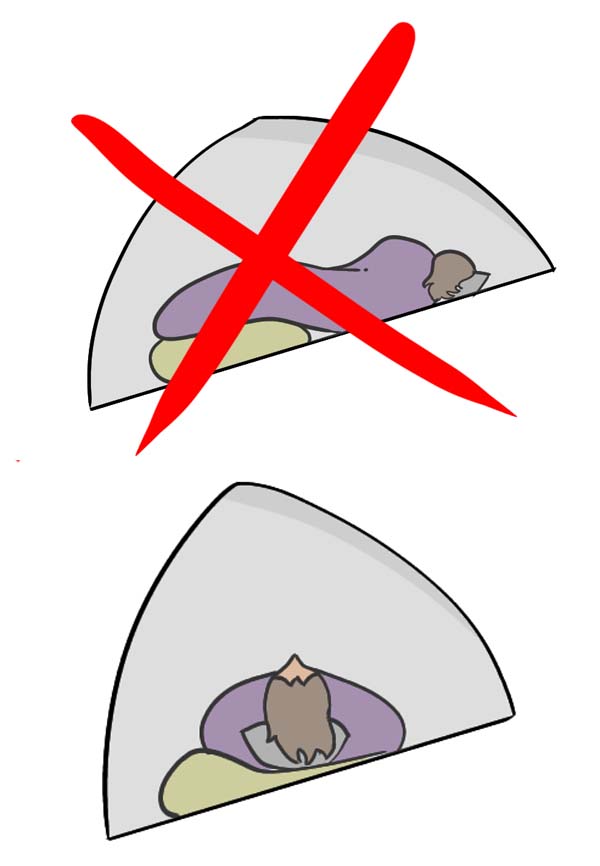
When sleeping on sloped ground, most people set up the tent so their head is upwards. In this case, you can put a sweater under your hips to keep yourself from sliding down.
However, a better solution is to sleep horizontally to the slope and prop up pad (as shown in second picture).
Also read: How to sleep on uneven ground
7. Velcro
In general, it’s a bad idea to put Velcro to attach the pad to the tent floor. For starters, the Velcro gathers lots of dirt. Once dirty, it doesn’t stick very well. It also only works if you sleep in the exact same spot in the tent each time – not something my family does. If you switch pads, you’ll have to put the Velcro on each pad.
But, if you want to try Velcro, here’s how to do it:
- Make sure your tent floor and sleeping pad are clean and dry.
- Use Velcro with a self-adhesive tape backing.
- Cut two strips of Velcro. They should be about 5 inches long each.
- The soft side of the Velcro should go on the tent floor because it gathers less dirt.
- Keeping both sides of the Velcro together, remove the paper from the rough side of the Velcro.
- Stick the Velcro to the sleeping pad. It should go across the pad. I’d put one strip underneath the head area and another strip at the hip area. But I’ve seen it positioned differently too.
- Remove the paper from the other side of the Velcro strips.
- Put the pad on the tent floor. Be careful because you only get one chance to do this!
Sources:
https://www.reddit.com/r/Ultralight/comments/c9egfl/antislip_strategy_for_sleeping_pad_and_bivy/ https://backpackinglight.com/forums/topic/104578/ https://www.amazon.com/dp/B07DQB1Z2R/
https://www.rokslide.com/forums/threads/how-do-you-keep-from-sliding-off-your-sleep-pad.12909/
Image credit: “Relaxation” (CC BY-NC-SA 2.0) by tbone_sandwich


Post your comments