
My strange and wonderful daughter has an obsession with bones since she was three years old. She even asked me if she could have my bones when I die. I said yes, but since we aren’t at that point yet, right now we are gathering all sorts of animal bones and cleaning them. 🙂
Cleaning and whitening animal bones for display is actually fairly simple. Below I’ll get into the details of what to do in each step of the bone cleaning process.
Guess what? I wrote an entire eBook about cleaning bones. It covers a lot more than I could fit in this article, including lots of expert tips and hacks that amateurs can use. You can buy it here (instant PDF download) for $4.99!

Jump to:
How to Clean and Whiten Bones
Cleaning small bones is pretty easy. However, it may take some time -especially if the animal is fresh and has lots of soft tissue on it still.
Step 1: Supplies
In order to clean animal bones, you will need the following supplies:
- Gloves
- Buckets or trash cans that can hold the bones being cleaned
- Dish soap
- Scrub brushes
- Hydrogen peroxide
Depending on the type of bones and their condition, you might need some other supplies too, such as as a power washer, muslin sack, pliers for removing teeth, and ammonia for degreasing.
Never Use Bleach for Whitening Bones
A lot of articles online about how to whiten bones say to “bleach” the bones. You should NEVER use bleach to get bones white. Why? Bleach will destroy the structural integrity of the bones.
Likewise, you don’t want to use any laundry detergents for cleaning or degreasing the bones. These detergents often contain bleach or other harsh chemicals which can destroy the bone.
Use Hydrogen Peroxide to Whiten Bones
Hydrogen peroxide (H2o2) is the safest and most effective way to whiten bones. This is what taxidermists use, including the ones at the Smithsonian and other prestigious institutions.
You can use the 3% hydrogen peroxide found in drug stores to whiten bones. The problem is that this peroxide is very weak. You’ll either need to buy a zillion bottles of it or do multiple soaks to get the bones clean and white. To get good results, you want 12% hydrogen peroxide.
Hair Developer As an Alternative to Hydrogen Peroxide
Unfortunately, not many pharmacies stock concentrated hydrogen peroxide in that concentration. If you can’t find 12% or higher hydrogen peroxide, you can use hair developer instead.
There are two types of hair developer:
- Clear Developer: This is the exact same thing as the hydrogen peroxide you’d get in a pharmacy. It will bubble up nicely and works great for cleaning bones. Get 40 volume clear developer here.
- Cream Developer: This has some emulsifiers added so it is creamy and thick. Some hardcore taxidermists won’t use it, saying the emulsifiers could mess up the bones. It also won’t bubble up like clear H202, so it isn’t as good at getting stains out from deep within bones. However, because cream developer is thick, it can be painted directly onto bones for spot whitening or for whitening skulls with antlers. Get 40 volume cream developer here.
Hair Developer Strengths:
Hair developer is listed in strengths by volume. Don’t think that 10v equals 10% though. The actual concentrations are as follows:
- 10 volume =3% hydrogen peroxide. Don’t get this. It’s too weak for good results!
- 20 volume =6% hydrogen peroxide.
- 30 volume =9% hydrogen peroxide.
- 40 volume =12% hydrogen peroxide.
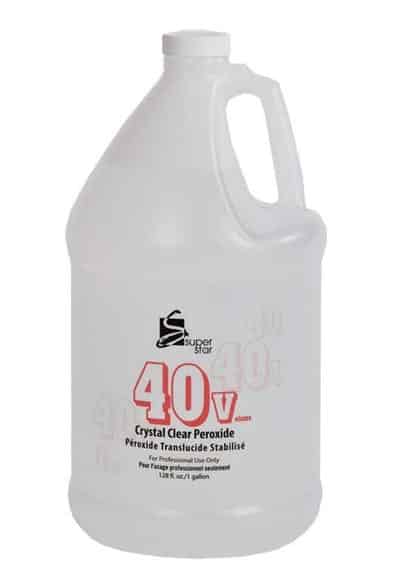
This giant bottle of hair developer (hydrogen peroxide) is 12% and is really affordable for a gallon. Buy it here.
Step 2: Remove soft tissue
If you found a bone that has been sitting in nature for a long time, then it won’t have any soft tissue on it. You’ll be able to skip this step. But, if you are dealing with fresh kills or roadkill, you’ll have to remove all the tissue before proceeding to whitening.
There are 6 main ways of doing this. I’ll go over them briefly here. For more detailed instructions, read this post on how to remove soft tissue from bones.
Method 1: Maceration (Soaking)
This invovles soaking the bones in water for weeks or even months. The water softens tissue and microbes in the water eat away at tissue. It’s very effective at removing hidden tissue in skulls without damaging them.
Method 2: Burying
When you bury bones, microbes in the dirt will eat away all the tissue. This is great for rotting carcasses, or if you are squeemish and don’t want to deal with stinky, gross tissue. The only main problem is that you can easily lose bones in the dirt, especially from small animals .
Method 3: Insects/Leave in the Open
You can just put the carcass outside and insects will eat away the tissue. You have to put the carcass in some sort of cage to protect it from scavengers.
Method 4: Corpse in a Box
With this method, you put a small corpse in a box that has holes in it. Insects will get to the carcass and eat away the tissue.
Method 5: Simmering
If you have a fresh kill with all of its tissue on it, simmering (not boiling) will loosen tissue so you can scrape it off.
Method 5: Steaming
Small carcasses can be put in a steamer. The steam will loosen tissue without damaging the bones.
Boiling: NOT Recommended
Despite what a lot of websites say, you shouldn’t boil bones to remove tissue. Boiling can damage bones and trap fat inside of them.
Isabel got this pig skull as a gift. It was boiled so got all gross, yellow and shiny from the fat that got trapped in it. It was HELL to degrease!!!! Lesson? DON’T BOIL BONES!
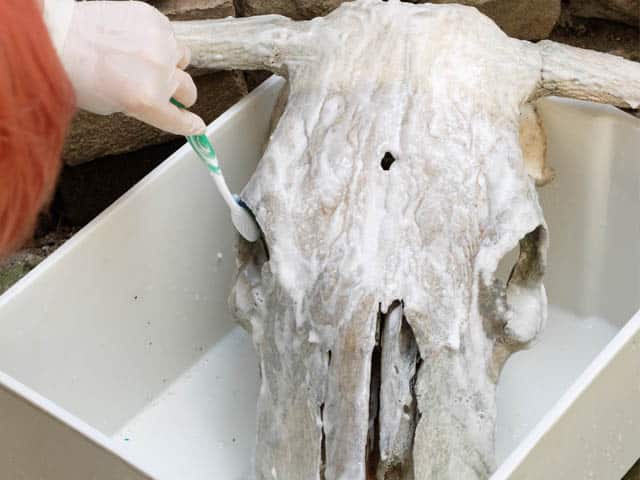
Step 3: Pre-clean the bones
This applies to bones you have found which do not have any soft tissue on them, but are caked with dirt and maybe have moss growing on them.
Use soapy water and the toothbrush to SCRUB the bones clean. The cleaner they are when you start, the better the hydrogen peroxide will work.
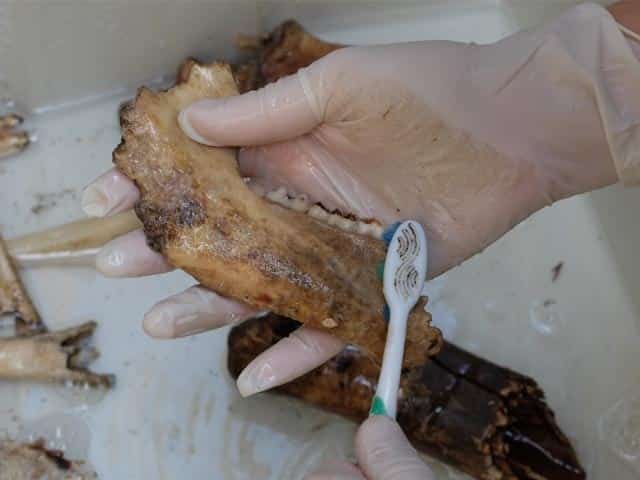
This gives a new definition to brushing your teeth!
Step 4: Degreasing
Degreasing is one of the most confusing steps in cleaning animal bones. It involves soaking bones in a solvent (like dish soap) to remove fat.
How do you know the bones need to be degreased? You’ll need to degrease if:
- The bones are yellow, clear, or shiny
- The bones stink, even after all tissue has been removed
- If the bones are from certain animals like: bears, pigs, boars, possoms, or seals.
It can take months for all the grease to get out of bones. If you skip this step though, the fat can slowly leach out of the bones and turn them yellow over time. They might even start to rot!
For more detailed instructions, read this post on How to Degrease Animal Bones.
Check out how greasy this possom skull is! It had to be thrown away because the fats started rotting the bone.
Step 5: Whiten with Hydrogen Peroxide
Once the bones are completely free of tissue and have been degreased, you are ready to whiten them. You’ll need hydrogen peroxide for this. As I said before, never use bleach for whitening bones. It will destroy them by making them flaky and brittle.
Here’s how to do it:
- Put the bones in your bucket.
- Pour in your hydrogen peroxide.
- Then top it with water.
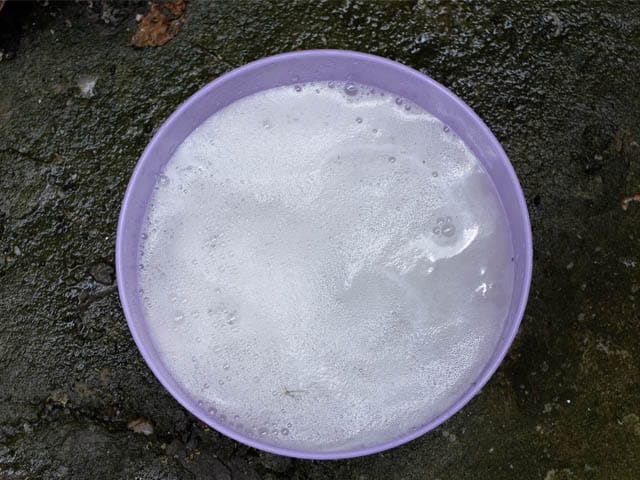
- The bones will start foaming, which means the hydrogen peroxide is working. Hydrogen peroxide also heats up when it is working.
- Loosely cover the bones while they soak. The H202 will stay active longer this way.
- Let the bones whiten for about 24 hours. Repeat if necessary.
How much hydrogen peroxide to use?
I usually use a ratio of 1:3 hydrogen peroxide to water. However, the higher the concentration of hydrogen, the faster and whiter your bones will be.
Tip: Try to find a container which fits your bones exactly. Then you won’t have to use as much H202 to cover the bones. If you can’t find a suitable container, you can use this pro trick:
- Line the container with a heavy-duty trash bag
- Put the bone in the trash bag
- Fill the container with water. The water will fill the space around the bone in the bag.
- Now pour the hydrogen peroxide into the trash bag.
Remember that hair developer works just the same as hydrogen peroxide. You can buy it in bulk here.
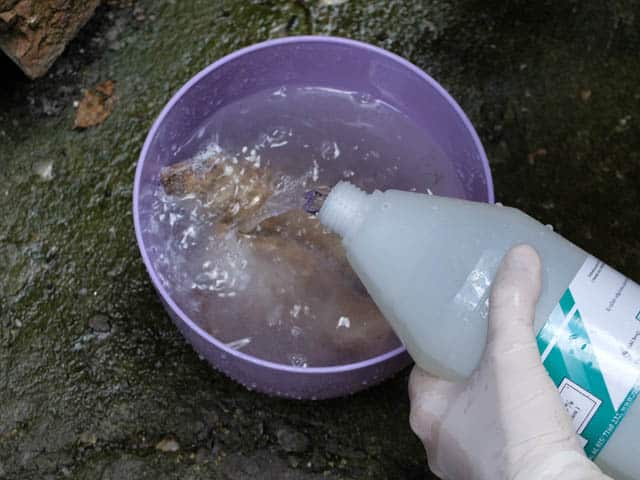
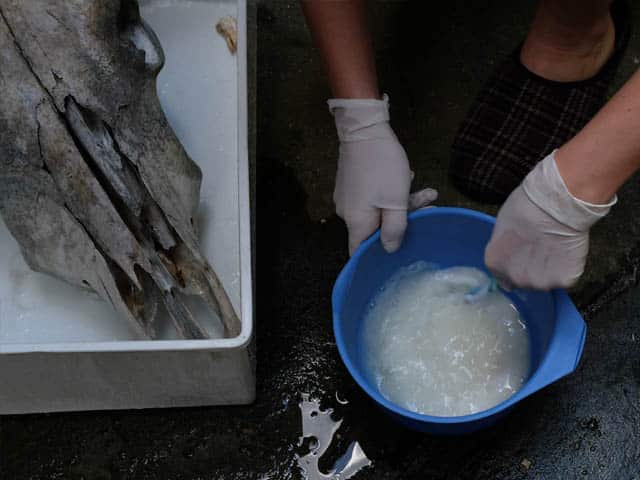
Adding peroxide to the bones
The peroxide is starting to foam!
How long to let bones whiten?
In general, I soak bones in hydrogen peroxide for 24 hours. This is usually long enough to get them white to my liking.
It’s important to note that I’m not going for pure white. If you want your bone specimens to be realllly white, then you’ll have to do several rounds.
*Note about Cleaning Very Dirty Bones
I once made the mistake of not adequately cleaning a very dirty bone. The hydrogen peroxide went crazy on it! It started steaming and got HOT. I thought it was going to melt the plastic bag it was in!!! You can see in the picture all of the steam coming off the bone.
The message? Make sure you do a really good job of scrubbing dirt off the bones before soaking in hydrogen peroxide!
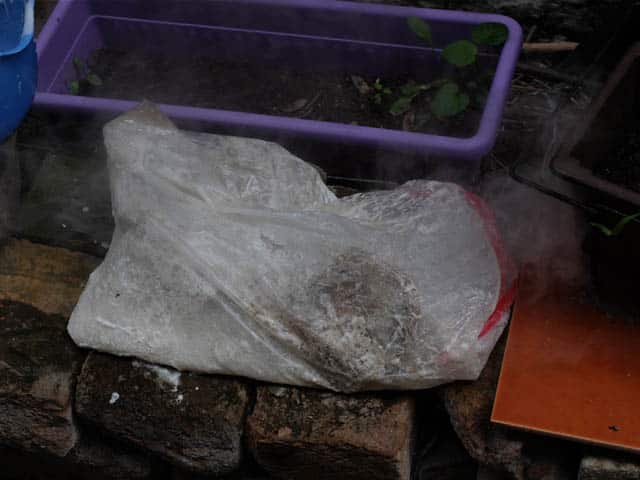
Check out the steam coming off this dirty bone!
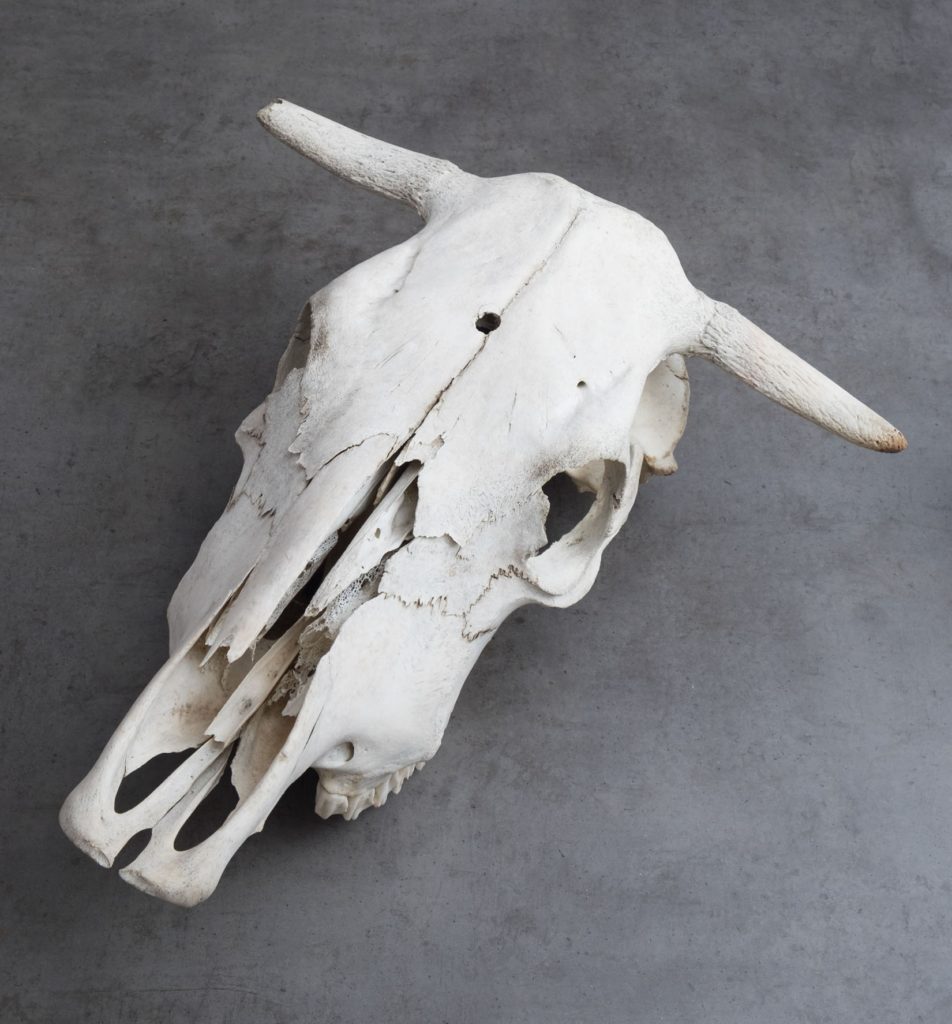
Before/After Pictures
These pictures should give you an idea of what realistic results you can expect when whitening bones with hydrogen peroxide. As I mentioned, you can do multiple soaks in H202 to get them whiter.
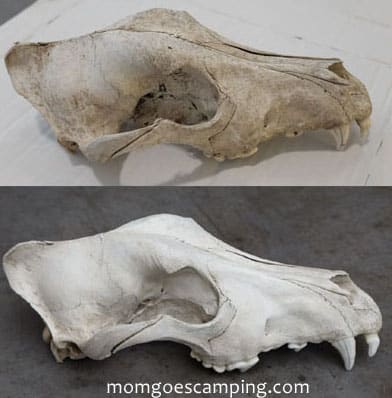
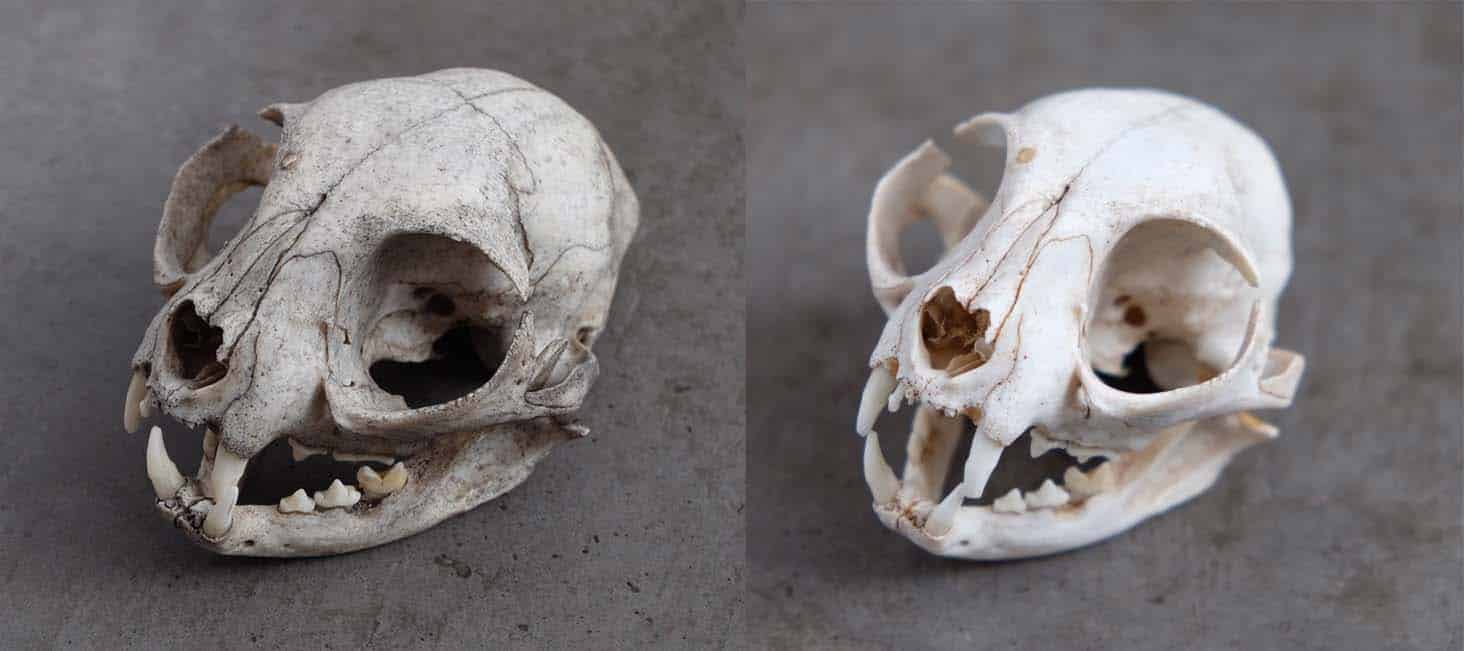
Dog Skull
Here’s a giant dog skull that a friend found for me. It had been sitting in the woods for a long time and was very dirty. I did one soak in 40v hair developer to get it whitened.
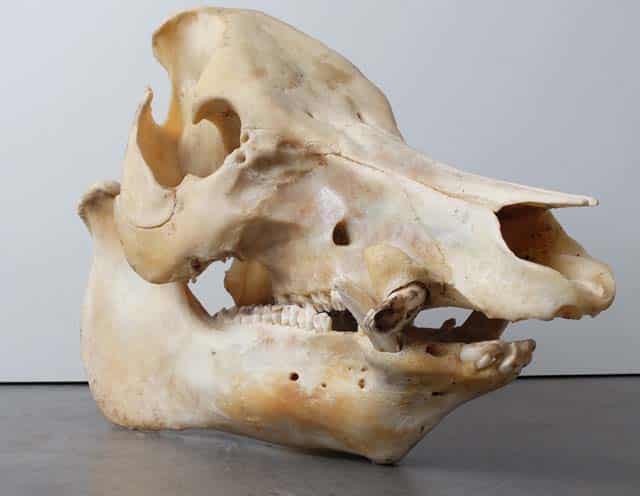
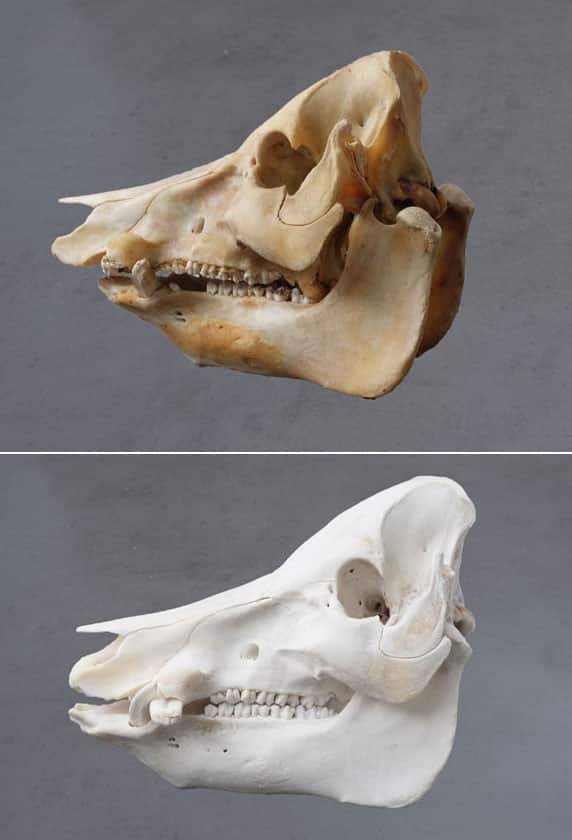
Greasy Pig Skull
This pig skull was given to us as a present. It had been boiled to remove the tissue (which is a bad idea!) so there was tons of fat trapped in the skull. I had to degrease it for 2 months and then whiten it before it got to this state.
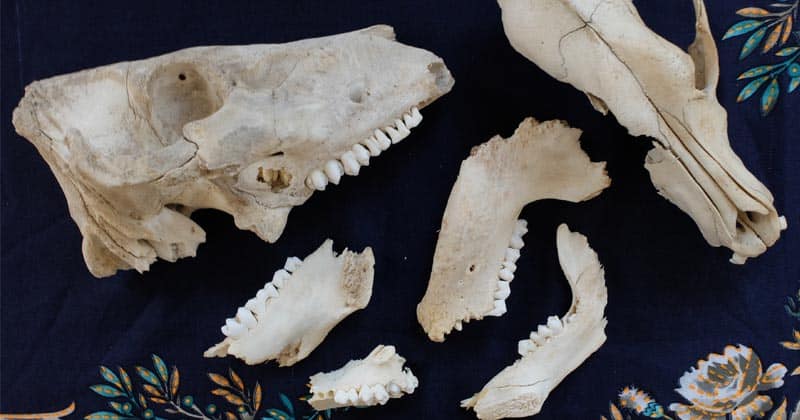
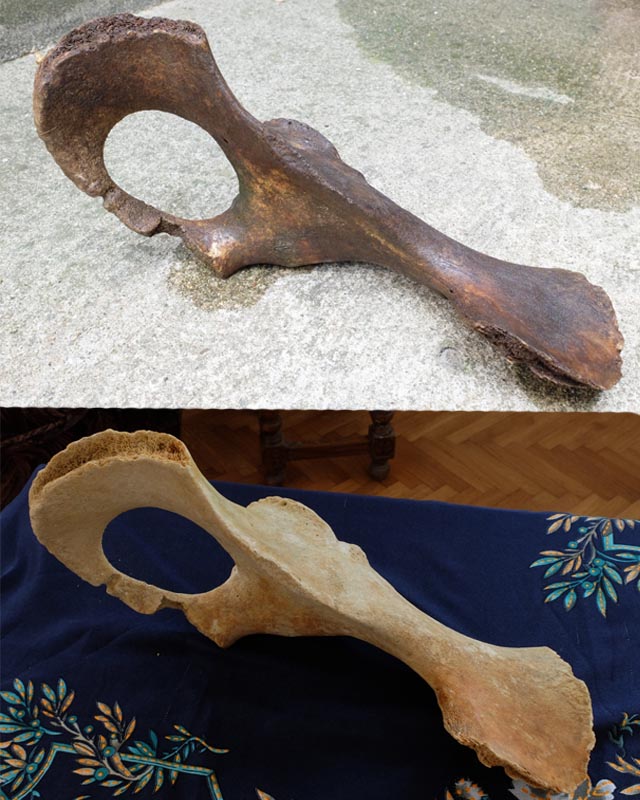
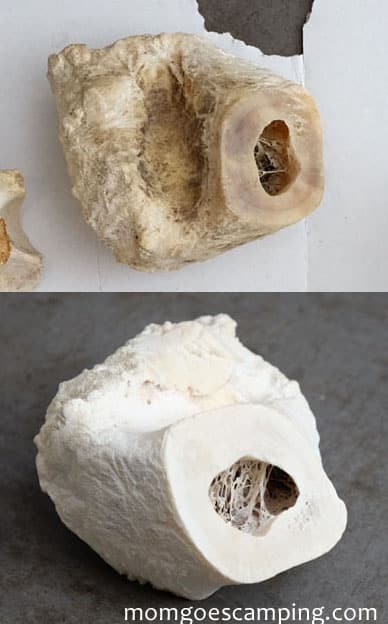
A Very Dirty Hip Bone
This hip bone was found in a river and was covered with dirt and moss. Considering how dirty it was when I found it, the bone came out nice and clean.
Cat Skull
This old cat skull was found in the woods and soaked in 40v hair developer for 24 hours.
Vertebrae:
This vertebrae stunk like crazy from all the fat trapped in it (notice the shiny parts on the before photo). I degreased it in acetone and then did a hydrogen peroxide soak. It came out nice and white.
Tips for Very Large Skulls or Bones
One of the first large skulls I cleaned and whitened was a cow skull. Isabel’s friend found it for her (what other 6 year old is lucky enough to have a friend who saves bones for her?). The skull was free of soft tissue, but was still really dirty and stunk badly. I didn’t realize it smelled so badly until halfway home on the bus. Sorry to all the people who had to put up with the rotting smell on the 30 minute bus ride! 😮
Cleaning such a large skull presented some problems:
- I literally could not find a plastic container large enough for soaking the skull. Not even laundry baskets were wide enough to fit it.
- I would have had to use TONS of hydrogen to immerse the bone. I’m not a rich person and wasn’t thrilled about spending $50+ on peroxide for a skull.
Luckily, there are some solutions for these issues.
Trash Bag Trick
Here’s a pro trick to use less hydrogen peroxide when whitening large skulls:
- Fill a trash can with water
- Then put the skull in a sturdy plastic bag into the water.
- Pour your hydrogen peroxide/water solution into the trash bag.
- Since the water fills the empty space around the skull and pushes on the bag, you won’t need as much hydrogen peroxide to emerse the skull.
Unfortunately, I didn’t know about this trick or have a trash can large enough to hold my cow skull. So, I put the skull into a big trash bag, poured in some hydrogen and water, and then tied off the bag. I kind of propped everything up in a plastic drawer.
Of course the trash bag sprung a leak. The peroxide pooled at the bottom, so only part of the skull got whitened. You can see a line on the skull from the part which was sitting in the most hydrogen solution. It looks terrible!
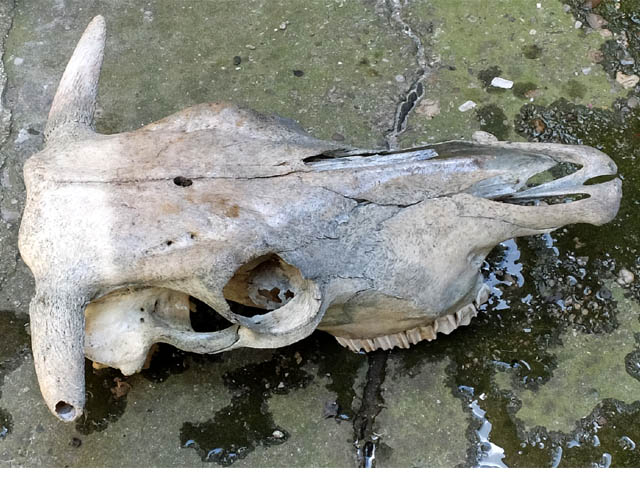
Notice the whiter line from my first attempt at cleaning the skull.
Baking Soda + Hydrogen Peroxide Paste
Baking soda is a natural cleaning agent, right? Could I mix it with hydrogen peroxide to form a paste, and then spread the paste on the bone?
I did a small test batch. The baking soda and hydrogen foamed a bit when mixed up, but still formed a paste that could be spread onto the skull. *You can buy cheap hydrogen peroxide here.
This is the paste I made from baking soda and hydrogen peroxide. It was about as thick as toothpaste.
The great thing about the paste method is that you don’t have to use lots of hydrogen peroxide and it can be spread in all those weird nooks and crannies skulls have. The only annoying thing is that you will have to do at least two rounds – one for the top of the skull and another for the bottom.
Applying the paste to the skull. It started foaming quickly, but the paste didn’t fall off.
Here you can see what it looked like afterwards. A huge difference!
Paint On Cream Hair Developer
As I mentioned before, cream hair developer has emulsifiers added to thicken it. What’s cool about this is that you can paint it directly onto bones. There’s no need to mix it with baking soda to thicken it! After applying, cover the bones with plastic wrap. Otherwise the cream developer will dry out too quickly.
Like with the baking soda paste, this method also won’t clean the interior of the skull. Make sure your skull is completely clean of tissue before you try to whiten it by painting on cream developer.
Pig skull with cream hair developer painted on it.
Want more tips on how to clean bones?
Have questions about antlers, horns, beaks?
Want to know how to glue together bones?
These are all things I talk about in my eBook. Get it here for $4.99.


147 Comments
Bethany
October 31, 2018 at 1:33 pmWith the paste method, how long did you leave it on? Did you scrub it with the toothbrush, or just apply and let it sit? After soaking or past methods, do you just rinse with water? Thanks!!
Diane
November 2, 2018 at 11:01 amI used a toothbrush to apply the paste. No scrubbing needed. I had planned on leaving the paste on at least overnight… but then it started to rain. So, it ended up being just about 5 hours or so. The rain rinsed it off! If it hadn’t rained though, I definitely would have rinsed it with water. Note that the baking soda and hydrogen peroxide solution will bubble up when you make the paste, but it still works well. I have since switched to using hair developer instead of normal hydrogen peroxide. The hair developer doesn’t bubble so works better for making a paste. (I’m going to write a post on that method soon!) *If your bone is small, it’s probably better to just soak it in hydrogen + water. That ensures the solution gets into all the nooks and crannies. Otherwise, you’ll have to apply the paste more than once, since you can really only do either the top or bottom at a time with the paste.
Olivia
April 21, 2022 at 12:09 amI have been bleaching bones and this last batch peeled a bit? Is this the periosteum? Did I process them too many rounds? Is there anything that can be done?
Diane
April 24, 2022 at 11:05 amDid you use actual bleach or hydrogen peroxide? Because bleach will really mess up bones. I’m about to publish a post on that.
Katherine
November 12, 2020 at 2:42 pmHii! So I recently got ahold of porpoise spine. I forgot about it and accidentally soaked it in soapy water for 2 days. At the moment it smells very bad. I’m about to begin washing it in dish soap, as it still has some meat left off in the middle. Do you have any idea why it stank up so badly? As I’m worried I did something wrong.
Diane
November 16, 2020 at 1:08 pmIf it still has some meat on it, then it is going to stink. There’s no way around it. Sea mammals also tend to be especially greasy, as do spine bones. So expect a lot of yellowish gunk to come to the top of the water! You’ll need to get all that tissue and grease out of the bones before you whiten them.
See these posts for more detail: /remove-tissue-cleaning-animal-bones/
/how-to-degrease-bones/
Abbi
March 28, 2022 at 10:40 pmThis helped so much!! I have 13 cow skulls I’m going to whiten that have been sitting in the desert for a long time. My question is…can I reuse my peroxide water solution for all of them? Thanks!!
Diane
March 29, 2022 at 2:45 pmYes…kind of. H202 evaporates into the air (not sure if that’s the right scientific term for what happens, but you get the idea). So, you can reuse it – but it will stop being effective fairly quickly. At best, the recycled h202 could be used as a pre-soak for dirty bones.
Huda
December 28, 2022 at 9:55 pmHi! We had to clean a goat skull for a group project my friend got all the tissues off with maceration and gave it me I kept it for a few days and fungus grew on and it started to smell but now I washed it water and tried bleaching it with hydrogen peroxide but it still smells bad and the areas where fungus grew are still coloured I really need help with this
Diane
January 3, 2023 at 11:38 pmYou probably just need stronger hydrogen peroxide or to do another few soaks. Let the skull completely dry before doing the next hydrogen peroxide bath. That way the hydrogen peroxide will absorb into the bone better and get to any fungi/gunk which is deep inside the bone.
Rachel
January 3, 2019 at 7:43 pmWhat ratio of baking soda to hydrogen peroxide did you use?
Diane
January 4, 2019 at 5:44 pmIt is probably around half/half, but I don’t measure. I just add enough of each to make a paste which was about as thick as toothpaste. If you are using hydrogen peroxide (and not hair developer), it will bubble when you mix them. Just spread it as it bubbles. Good luck!
Eva
January 2, 2022 at 1:07 pmHi, I have a mouse skull I need to whiten but it’s very delicate, will hydrogen peroxide cause it to become brittle and break? And it it will do you have any other ideas of what I could do to whiten?
Diane
January 2, 2022 at 9:13 pmShort of leaving it in the sun for a VERY long time, hydrogen peroxide is really the only safe way to whiten bones. It won’t make the skull brittle. I have used it on delicate bones and it is fine. 🙂
Robsaint
January 19, 2019 at 9:36 amHere’s another great way to save on peroxide for large skulls;
Put the skull in a bin bag.
Place the bin bag inside a bin or other large container.
Fill bin/container with water. This pushes air out of the bag making a snug fit around the skull.
Fill remaining space inside bag with 50/50 peroxide/ water. Thus using far less peroxide and getting great results.
Discovered this method from fellow skull collectors on Facebook groups.
Diane
January 19, 2019 at 9:24 pmThat’s a great trick! With the cow skull shown in the article, I tried putting it just in a bag and the bag broke (which is why there was a white line around it from where the h2o2 accumulated at the bottom of the bag). Putting it in a bin and filling it with water would have prevented the bag from breaking. Thanks! 🙂
Linzi
January 22, 2022 at 9:14 pmHi, green article thanks. I have a large whale bone vertebra that’s been in a shed for 5 years so I decided to skip to the whitening stage. It’s my first time whitening a bone and I think I’ve gone really wrong.
I decided to use your cream peroxide method however I forgot to cover with plastic bag and now the bone has blackened after only 5 hours. Any suggestions please? Can it be saved?
Diane
January 26, 2022 at 3:58 pmHey. No reason to freak out. Vertebrae (especially whale ones) are tough because they have a lot of blood and fat. The black color is likely blood that is coming out. It can also be bacteria that was feeding on the blood and fat left in the vertebrae. In any case, you need to degrease the vertebrae by soaking it in soapy water to get all that fat out. Then do hydrogen peroxide again. I would use actual peroxide (not cream developer) because it can get deeper into the bone and push out nastiness. You might need to cycle between peroxide and degreasing a few times.
There is also something called Iron Out which a lot of taxidermists use to get blood stains out. I don’t have experience with it though.
Here are some other people who had similar issues.
https://www.taxidermy.net/threads/35152/
https://www.taxidermy.net/threads/404424/
https://www.taxidermy.net/threads/364220/
https://www.taxidermy.net/threads/388557/
Diane
January 29, 2022 at 3:51 pmDon’t stress too much about the bones turning black. It is most likely blood that is causing staining. Once the blood is out, a hydrogen peroxide bath should whiten them up.
Vertebrae have lots of blood in them. It leaches out slowly and causes weird black staining. The black could also be from bacteria which were feeding on the grease inside the vertebrae (whales are notoriously greasy). I suggest that you degrease the bone to get any remaining grease out. Then you can try hydrogen peroxide again. You might have to cycle back and forth between the hydrogen peroxide and degreasing a few times to help get any blood stuck inside out.
Some people recommend using Iron Out to remove blood stains (though I personally have never used it). check out these posts where peopel had the same problem:
https://www.taxidermy.net/threads/364220/
https://www.taxidermy.net/threads/404424/
https://www.taxidermy.net/threads/388557/
Alona V.
January 19, 2019 at 6:40 pmHey guys! There is no way for me to get a good amount of hydrogen peroxide in my country. In case the bones don’t have any tissue on them would soaking them for a few days in hot (but not boiling) water with laundry detergent, replacing the solution every 24 hours and occasionally brushing it with baking soda\toothpaste and tooth brush be good enough?
I am not very interested in whitening the bones, maybe just a little bit.
Thanks.
Diane
January 19, 2019 at 9:21 pmMost laundry detergent has bleach in it. It will clean and whiten the bones… but bleach will make the bones turn flaky after a while. Even if you can’t find hydrogen peroxide in big bottles where you live, you probably can find hair developer (that’s what I use now). Just go to a beauty supply store and get it. Use it + some water for soaking the bones. They will be clean and whiter. 🙂 For a large skull, you can get by with just 1 liter of hair developer (costs about 10-15 euros in beauty stores). To save on it but still get the skull clean everywhere (including inside all those foramina holes), I first soak the skull in water with just a bit of the hair developer. After a day or two, I dump that solution. Then I’ll apply a paste made from the rest of the hair developer and baking soda.
Kaylin Brodzki
April 13, 2019 at 4:22 pmAre these methods safe to use on bird bones? I’m a little worried about weakening or breaking the bones of this beautiful specimen I found while cleaning my patio for spring. The remains are already mostly clean, however there is a bit of tissue I still need to clean off…
Diane
April 18, 2019 at 11:11 amYes, bird bones are super fragile. Macerating (soaking in water) is probably the best solution. Be warned that soaking will make the beak sheath crack and warp. Even many professionals don’t even bother trying to save the beak sheath because it is so fragile.
If the beak sheath is still intact, you can let the bird bones sit in the open (or in a box with holes poked in it). Every few days, give the beak sheath a tug to pull it off the bone. The sheath then gets stored in Borax until the bones are clean. Then you glue the sheath back on.
As for whitening the bird bones, hydrogen peroxide is fine. The only issue you might come across is the beak or certain areas of the skull coming apart, since the skulls are actually several pieces held together by connective tissue. This is often the case with young animals. I use a plastic tea strainer to catch tiny bones when dumping the H202.
Name *
April 30, 2019 at 11:45 amHello I Have A dog skull i’ve dryied the skull and i cleaned it but it still have some bad smell can you lead me please what to do Thank’s
Diane
April 30, 2019 at 2:09 pmSometimes bones get a weird smell when they are still wet, but it goes away when they are dry. However, if the bones are dry and still stink, then it is probably because there is still lots of grease in the bones. You’ll need to:
-try degreasing (soaking in soapy water) again. You might see some nasty tissue you missed float up too! Yellow spots on the skull are a sign that there is grease trapped inside.
-Consider removing the teeth (carefully – they crack easily). There could be some nerve endings or other tissue stuck under them. Reinsert the teeth while the skull is still wet or they might not fit back in.
-Use a wire to poke into any holes in the skull. There could be tissue lurking in there – especially if the skull was boiled to clean tissue off.
After soaking/degreasing again, do another round of hydrogen peroxide. Put it outside to thoroughly dry. You can also soak it in rubbing alcohol to force water out of the skull, but this is probably not necessary.
Name *
May 8, 2019 at 5:42 pmHi there! Just wondering, what if you have just a turtle shell? Could you just clean with soapy water? Or is there a way to disinfect it without changing the color? Thanks!
Diane
May 9, 2019 at 12:18 pmThe colorful part of turtle shells is actually a sheath made out of keratin (much like fingernails and also animal horns). Unfortunately, keratin is really fragile. Don’t soak the turtle shell or the sheath will come off and warp.
Your best bet is to let the tissue rot off of the turtle shell in an open space. Unfortunately, the sheath might still separate from the bone. If this happens, you’ll need to store the sheath in Borax until the rest of the shell/bone is clean. Then you can glue the sheath back on, possibly letting it get a bit wet so it softens and fits back on nicelly.
If you want to whiten the underside of the turtle shell (the bone part), you could paint some hydrogen peroxide onto it. I talk more about this in my ebook – https://gumroad.com/l/cleanbones
Hope that this helps!
Dawen
May 11, 2019 at 6:04 amHi, I’m mostly concerned with sanitization. I found bones on the beach which are completely stripped of flesh. Right now the color is amazing and I don’t really want to whiten them. Currently I’ve got them in water and Dawn dish soap for degreasing (I’ll see if that affects the color at all, I guess). Would that be enough to sanitize them? Or do I still need some hydrogen peroxide, and if so, what’s the minimum I could get away with?
Diane
May 14, 2019 at 11:02 amIf they’ve been on the beach for a long time, the exposure to sun and salt water should be more than adequate to sanitize them. If you like the color, then don’t do anything at all 😀
Dawen
May 16, 2019 at 6:03 pmThank you!
Dawn
May 16, 2022 at 8:17 pmHi I have two jaw bones that I am soaking in the peroxide. Some of teeth fell out. Is there anything that can prevent this? Thanks!
Diane
May 17, 2022 at 11:36 amIt’s fine if the teeth fall out. Actually, it makes it easier to clean the inside of the jaw area (large animals like cows and pigs sometimes have giant nerve tissue which gets stuck in there and starts to stink). Just glue the teeth back in once the jaws are all clean and dry. The only real issue is trying not to lose the teeth when doing the maceration step to remove tissue.
Laurie
June 16, 2019 at 11:27 pmI am selling my home so I dug up my dog in order to take him with me. We buried him about 4 years ago and we live in a pretty hot/dry climate and there are only bones left with some tiny bits of fur. I don’t want to damage his bones but I want them to look nice and possibly even try to put his skeleton back together. I already put them in 2% peroxide to disinfect them. Will I also want to degrease them? They are very yellow, but I don’t mind the color at all.
Diane
June 17, 2019 at 3:45 pmYellow usually means that there is oil left in the bones. However, when an animal is buried, microbes will usually eat a lot of the oil out of the bones. That’s why buried bones usually turn out nice and clean but bones which were boiled will get gross (boiling will trap the oil in them!).
Over time (which could be a very long time), oil left in the bones will start to go rancid and destroy the bones. And stink in the process. So, degreasing is necessary if the bones are yellow. But degreasing is also a very long, tedious, and often frustrating process (I’m working on a post about it now. The post is taking forever because degreasing takes forever!!!!).
I would recommend this: Get some stronger hydrogen peroxide (there’s a link in the article for hair developer which is 12% hydrogen peroxide. You can also get it in some beauty shops – ideally get the “clear” kind and not “cream”). Do another round with the stronger hydrogen peroxide. It not only disinfects but whitens the bones. Then see how yellow the bones are. The yellow might just be discoloration from dirt. If the bones are still yellow, then you’ll need to soak in warm water with lots of dish soap until the oils come out.
BTW, I’d love to see photos of the articulated bones if you succeed. I have yet to get a complete skeleton of an animal large enough to articulate. 🙂
Laurie
June 17, 2019 at 5:36 pmThank you for your reply! I will go get some hair developer and give that a shot! I will definitely send you pictures if I am successful putting his skeleton back together. I also want to paint his skull in a Día de Muertos style even if I can’t articulate his skeleton. 🙂
Clair Nelson
June 26, 2019 at 3:05 pmHi I have just today burried a Heron skull in a damp dark woody area of my garden right way up in bewteen a layer of sawdust. The soft tissue was already very decomposed, eyes missing etc. I have cleaned off as much skin as I could. How long do you think I should leave it in the ground for? Also do you have any tips on preserving the beak/keratin?
many thanks
Diane
June 28, 2019 at 11:36 amUpdated: Beaks are really hard to preserve on birds. Even a lot of professionals don’t bother to preserve them because they are so fragile.
To save the beak, you’ll need to keep the dead bird above ground to let the tissue rot off. Every day or so, give the beak a little tug. The sheath should come off as it loosens from the rotting. You can then store the sheath in Borax powder until the rest of the bones are clean. Afterwards, you reapply the beak sheath over the core with a bit of glue to hold it on. Unfortunately, it’s a really tricky process. 🙁 I talk about this more in my ebook – https://gum.co/cleanbones
Jane
August 1, 2019 at 1:25 amFirst of all, I love how you are fully embracing and empowering your daughter’s passion! And thank you for this thorough help! This is the best resource I’ve seen so far and I’m grateful. Hoping you can help me with something specific: I am currently degreasing some “nature cleaned” seal bones found on the beach. They seemed dry but of course are super greasy and stink to high heaven!! I’m wondering if you have any recommendations (or if it’s just to have patience with this process..?) for extracting the gunk. There are a few spinal bones which are fascinating. The cord was gone but the connective tissue between the vertebrae. As they’ve been soaking (dawn and water, out in the sun, changed every 24 hours), the vertebrae are starting to look gummy where they used to connect, and some white bits are coming to the surface as well. How can I effectively degrease and get rid of this stink as quickly and efficiently as possible? Like you, my apartment living is limiting my options here. Thank you for your advice!
Diane
August 2, 2019 at 9:25 amSeal bones! That’s awesome!! I’m looking at a picture of their skeleton now. It makes sense that they are greasy since sea mammals have so much blubber on them. Ammonia is an effective degreaser and is easy enough to work with.
I also found it beneficial to cycle between degreasing (with warm, soapy water) and hydrogen peroxide. Even though H202 doesn’t actually degrease, it does seem to help push the fat out from the center of the bones. Otherwise, the fat just kind of dissolves and sits in the bones. It also really helps to use very warm water for degreasing. A lot of people buy aquarium heaters to keep the water warm so they don’t have to keep changing it out as the water gets cold.
I wrote more in detail about all these methods in my ebook https://gumroad.com/l/cleanbones It’s just $5 if you want to buy it 😀
Just be prepared for a long battle. Degreasing is a pain in the butt.
Jane
August 2, 2019 at 12:36 pmThis is immensely helpful. Thank you for this thorough help and reassurance. Having launched headfirst into this project without fully knowing what to expect, I can’t tell you what a relief it is to have your site and thoughtful comments as resources.
How do you know when to stop degreasing? Do the bones need to dry out in between the water and H202 or can they just switch baths?
On the vertebrae, will the gummy/gooey/tacky surfaces stop looking that way with enough soaking, or is it a judgement call on when to call it quits?
Thank you again so much. Really appreciate your help with this project.
Diane
August 4, 2019 at 4:15 pmIt will lose its yellow color and translucency when degreasing is done. Again, it can take a REALLY long time. Can you see the water getting gross and murky, maybe even with globs of fatty stuff floating to the top?
You don’t have to let it dry out between baths. However, if you want to cycle between H202 (hydrogen peroxide) and degreasing, you should let it dry out. Bones absorb H202 much better when they are dry.
I wonder if the tackiness is from grease or not. If there’s a lot, then it might be some tissue left over. The discs and connective tissue on vertebrae can be tough to get off. In that case, drying it out will probably help. Once it’s dry, then you can scrape it away with a scalpel. See this post: https://www.taxidermy.net/threads/353341/#post-2406694
Also check out this thread: https://www.taxidermy.net/threads/395577/ It’s a crocodile in question, but you can see how much tissue is stuck on the bones.
And I’m glad to be of help. I love knowing that there are so many other “bone ladies” out there, haha! 😀
Jane
August 4, 2019 at 8:46 pmTruly a life saver thank you!!
there definitely isn’t visible tissue left- the bones were very picked clean, but maybe the connective tissue is different? I’m definitely learning a lot about anatomy here! Can’t find a great picture but in this link, the part that I’m talking about is the “body” http://www.askabiologist.org.uk/answers/viewtopic.php?id=8757 – and on that body is a tacky spot in that solid part, in a oval shape, on both sides of the bones where they connected to other vertebrae. The spot is a creamy yellow color where the rest of the bones are white. Could that be some kind of tissue, or is that marrow or something? After the first soak there were little bits of feathery white matter coming off of those spots too.
After the first soak (48 hours, Dawn), the water ran yellow, but with consequent soaks it was lighter and lighter and never had anything floating. The smell continued to be horrible, though a little lighter each time.
I put them in baking soda to dry and try to transport without horrible smells… I’ll finish drying them and will see if those softer spots can be scraped at all, and will then try the H202 soak to see if anything can be further drawn out. Stay tuned!!
Elizabeth M MacNaughton
August 6, 2019 at 7:06 pmI’ve recently started collecting road killed white tail deer bones from the gravel pit where the county dumps them. They have been mostly cleaned of tissue by bugs and scavengers. I would like to clean them up to use as decorations in my tarantula’s tanks. What percentage of H2O2 to H2O do you use? I bought the 12% 40V you recommended above. Thank you for your time and expertise!
Diane
August 6, 2019 at 8:50 pmThe more H202 you put in, the whiter they will come out. But it also means you’ll blow through H202 quickly. I’m not too scientific about it at all. About 50/50 is a good ratio. When the bones aren’t too dirty, I’ll use even less H202. If I want them even whiter, then I’ll do another round of H202. Really, don’t obsess about ratios. 🙂
The county has a specific place only for animal remains??? God that has to look creepy and cool!
Katrina Brown
August 17, 2019 at 2:44 amAny suggestions on how to remove plant matter (roots / moss) from tight places? Between teeth, inside skull cavity, etc. Also, any suggestions on how to get rid of impacted mud? Thank ou!!
Diane
August 23, 2019 at 8:52 amPipe cleaners work well for pushing dirt/plants/etc out of tight places. Usually (on skulls) the debris is stuck in the nasal cavity. That sucks because I love how the nasal cavity looks, and you can’t really push anything into it without destroying its delicate structure. So, you can soak the bone to loosen/soften the debris. Then use a hose to blast out the debris. Depending on where the debris is located, you can aim the hose from the nose or from the hole in the back of the skull.
As for mud, soaking is the way to go. It will loosen mud and then you can use an old toothbrush to brush it off. If there’s still mud stuck, then you can just let the hydrogen peroxide do its magic. Its bubbling will push the dirt out. May take several soaks though.
Name *
October 4, 2019 at 3:57 pmHey Diane, this helped me so much! I found a pretty clean rabbit skull recently and it’s sitting in the whitening bath right now. Unfortunately I only got cream developer, but at least the 12%-kind. I’m very excited how it’ll turn out – thanks for sharing all of your valuable experience with us!
Diane
October 7, 2019 at 8:22 amI’m glad to be of help. I have a rabbit jawbone. It’s fun to pull the teeth (incisors) out of the skull to show people how far into the skull they go! Cheers. 😀
Kristie
October 18, 2019 at 3:37 amWonderful information! Thank you so much! I’m curious if the burying method for step one can be used for a deer skull with antlers. Will the bugs and soil bacteria eat the antlers? I live in Seattle where we are currently entering the rainy season. Will soil wetness be a detriment to the process? Thanks again!
Diane
October 20, 2019 at 6:56 pmAntlers are actually bone, so they won’t be eaten by bugs etc as horns will (horns are made of keratin like our fingernails). That’s why you can sometimes find antlers just laying around in nature. So, it’s perfectly fine to leave antlered skulls out for insects to clean. The antlers might get a bit stained if you bury them though. I talk about this in my book in case you need more detail. 😀
Alice Dudoich
October 20, 2019 at 12:08 amThanks so much for the book you wrote. I’ve been collecting bones from my sister’s property in Alabama for years but am just now trying to do something with them. I am working with a dog skull and got carried away with a red Sharpie decorating the skull with native American motifs. Didn’t like it and when I tried to remove it, I wound up with a breast cancer pink skull. Any ideas about getting it back to white? Thanks again!!
Diane
October 20, 2019 at 6:53 pmHmmm… that’s a tough one. I guess I’d try using hydrogen peroxide to remove it (maybe that’s what you already tried). If that doesn’t work, then I’d work with the pink color. Think of it as a challenge to make something cool with a pink skull! 😀 As a last resort, you could always paint over it.
Melissa Myers
October 20, 2019 at 11:25 pmHow did you fix the cow skull that was stinking? If it’s stinking does that mean it still has fat in it? I found a seal flipper (I think) at the coast and I’ve soaked it and soaked it in dawn and water and it still smells horrible. Could I try to use baking soda to deal with the smell?
Diane
October 21, 2019 at 11:13 amThe cow skull only stunk because of the rotting plants/debris inside of it. My pig skull, however, stunk because of all the grease in it. Seals (as well as bears and possums) are really greasy too.
Degreasing is a serious pain in the ass. It literally took over a month of soaking the skull before the fat came completely out. There are things you can do to make it go faster, like keeping the water warm with an aquarium heater or cycling between degreasing and hydrogen peroxide. Or, instead of soaking in dish soap, you could try soaking in ammonia or acetone — but that must be done outside because of the fumes. Also, the acetone has to be completely evaporated from the bones before you try hydrogen peroxide again because the two are explosive together! 😮
The best advice I can give to you is to be patient with degreasing. Baking soda might help with some of the smell temporarily but, because the grease is inside the bone, it will start to rot and stink.
Jane
October 21, 2019 at 1:56 pmHi! Me again from July seal bones! I have been soaking the vertebrae and rib bones for coming up on 12 weeks now. I was changing the water weekly but since it’s such a gross and stinky project have been letting them soak for 2-3 weeks between changes now. The water has gotten progressively lighter but they’re still a bit smelly. It went from a dark yellow brown color to more of a pale brown, mostly clear. The smell is more tolerable now (no more gagging, at least!) but definitely still feel like I’m miles away from a point where I will feel comfortable bringing these inside the house. Will try hydrogen peroxide this week for the next soaking, and hope that takes it up a notch. How do you know when you’re finally done with the soaking and can begin the actual whitening with the peroxide and eventually drying and displaying? Thank you again for all your help and support!
With the flipper I’d imagine it will need a similarly long soak, depending on the size of the bones.
Diane
October 22, 2019 at 10:23 amYou’ll know you are done when the bone doesn’t have a translucent look to it anymore. Definitely try doing a hydrogen peroxide bath. H202 doesn’t cut through grease, but it does help you see where there is still fat lurking and helps push some of the fat out from deep inside. I’ve never had to deal with a bone that greasy (it seems like seals are exceptional when it comes to grease) but I have heard of people soaking bear skulls (also greasy) for months before getting them done. 🙁
*The bones will stink less when they are completely dry. But there may still be fat inside the bones that can rot and over time destroy the bones. I know this is frustrating. I feel you!!!!
Btw, I’d love to see photos. You can send them to [email protected] if you wish. 😀
Name *
October 27, 2019 at 12:26 pmI’m trying to get some chicken bones cleaned and whitened to use for decorations on a Halloween Witch doctor costume.
I managed to get hydrogen peroxide at 6% here in Malaysia and was wondering if its ok to use on bones i boiled and cleaned using soap water. 🙂
Diane
October 29, 2019 at 12:44 pmIt depends on how long you want the decorations to last. If you boiled the bones, then there might be lot of fat trapped inside of them (if the bones are clear looking or shiny, then there’s fat in them). Over time, the fat might start rotting and the bones will stink. That could be a year from now, or 10 years… Since these are just chicken bones, I guess it won’t be that big of a deal to throw them away later.
Yes, you can use the 6% hydrogen peroxide on the bones. They should get nice and white (at least whiter) and make for some cool decorations. 😀
Cori
January 12, 2020 at 4:40 pmHi, just wondering about the trash bags. If you use a black one, will it discolor the skull?
Diane
January 12, 2020 at 10:37 pmNo, the plastic won’t discolor anything so you can use any color trash bag you want. The only issue I could think of *maybe* occurring is ink from something on a trash bag getting into the skull. But that would only be if you used the ink-side inwards.
Cheryl Pounds
July 20, 2022 at 5:53 amI’m so excited to have found you! Everyone I know thinks I’m weird cuz I love critter skulls. Also I think I could learn a lot from you.
I have skulls from chipmunk to twin unborn deer to buffalo. I really enjoy taking them down to the bone and got so excited last hunting season cuz I figured out an easy way to empty the brain cavity with hardly any effort. I would love to try the next step – whitening. And I would have really ruined things if I hadn’t stumbled on you here. 😁
I am wondering about how you keep the teeth organized so they get back into the right hole. What glue is best? Definitely starting with my least favorite so I’ll be prepared to do the best possible job on the favs.
Also, I read your post up above about baby skulls falling apart. Will my itty bitty chipmunk fall apart just cuz it’s so delicate? Will it be obvious how to fit them back together! Can they be glued back together without leaving glue blobs everywhere?
I ordered the V40 from Amazon and got plastic bags. Ready to go with the teeth 😬😳😅 Fingers crossed… Have a good night, new friend!
Diane
July 29, 2022 at 6:10 pmThe chipmunk skull should be fine with H202. I do mice bones from owl pellets all the time and they are fine. But the unborn deer — it’s a fetus? Fetal bones aren’t fully formed yet and could fall apart. To play it safe, I might skip that one! And glad you found this helpful 😀
Raub
February 20, 2020 at 2:48 amI think you’re probably a great mom…
Diane
February 20, 2020 at 11:09 amHaha, thanks! 😀
Kris
March 7, 2020 at 10:19 pmDo you have any tips for really small bones? I have a mummified mouse I wanted to clean up, but due to how tiny it is I don’t know where to start.
Diane
March 9, 2020 at 10:28 amIf it’s mummified, you need to start by soaking it in water to loosen the tissue. Then try to remove as much of the tissue you can. Then soak again until all the tissue has dissolved. You’ll need a tea strainer or cheesecloth for straining the soak water so you don’t lose any bones. Yes, it will be a major pain to get the tiny bones, like vertebrae, toes, etc. Like a major pain! Fur and tissue will get stuck on them. When you strain the water, pieces of tissue will get stuck to the bones. Alternatively, after the initial soak to soften the tissue, you can use the ‘bones in a box’ method. With this method, insects eat up the tissue so you get clean bones. This method is also a bit of a pain because fur gets tangled with the bones and the connective tissue doesn’t always get eaten so quickly. /remove-tissue-cleaning-animal-bones/
Once you get the bones free of the tissue, then you can just soak in hydrogen peroxide. Use a tea strainer or cloth when dumping the hydrogen peroxide so you don’t lose any bones.
I don’t want to discourage you, but don’t be surprised if you give up on retrieving all of the bones. It takes a LOT of patience to get all of them clean! I am in awe whenever I see a perfectly articulated rodent skeleton now.
Dave
March 21, 2020 at 8:16 pmHey, thanks for the article and for all the great replies here in the comments.
I’m cleaning some bovine bones I found almost two years ago, following your guide.
Some of them have slight yellow patches, and though I’m doubtful it’s fat, I thought I’d degrease them anyway.
How long, do you think, oil would show up in the solution I’ve soaked them in if it were fat?
In other words, how long before I can take them out, confident that the yellowish bits are not fat?
Thanks a lot!
Diane
March 25, 2020 at 2:15 pmYou are right: the spots probably aren’t fat. One easy way to check is to do a hydrogen peroxide bath to whiten. If the spots are from stains, they will be gone (or mostly gone) after whitening. If the spots are from fat,then they will still be there. You can switch back and forth between degreasing/whitening without any issues.
Nanette
March 25, 2020 at 8:50 pmI’m working with found bones to make jewelry. Have you had any success with using a tumblr (like a rock tumbler) to polish bone? I’m not sure if it will be too harsh.
Diane
March 26, 2020 at 12:47 pmI had a rock tumbler when I was a kid and desperately want one again (too heavy to ship to where I live and I’ve been too lazy to make one myself). I also think it would be too harsh on bone. But it might also expose the spongy bone structure in a really cool way. Maybe test it with a chicken wing bone or some other bone you don’t care about – and let me know about the results. I’m curious!
Chris Green
May 4, 2020 at 8:15 amHi just found a dolphin washed up on a beach in NZ. It died giving berth so baby still with it ?.I would like to start bone carving ?which bones would be the best to start with? would the tail bones be good? or the jaw bones. it is complete as of today I have spoken to DOC they are not interested and would like it to just wash out to sea? It is going to be a mission to cut this carcus up ? so would it a be a good mission or not? THX Chris
Diane
May 4, 2020 at 10:13 amWow! That sounds like an awesome find. I don’t have any personal experience with dolphins. However, I do know that sea mammals tend to be VERY fatty. The bones might need a lot of degreasing. The vertebrae bones and tail bones are going to be the greasiest and probably take the longest to degrease. The ribs and shoulder blades should be the easiest to clean. In any case, if you are new to bone carving, start with some bones that you don’t like as much and practice on those before you move to the cooler bones like the skull or jaw (I particularly love scapuli, but that’s me 🙂 ). Good luck!
Clay Bonnyman Evans
May 6, 2020 at 6:14 pmHi, Diane.
Thanks for all this good advice. I feel I’ve been able to do a pretty good job of cleaning up and whitening (or at least lightening) a large dog skull I found a few weeks ago.
Years ago, I painted a deer skull with one antler in sort of a Southwest color scheme. With this dog skull, I’m considering doing the same, but maybe more of a Dia de Muertos color scheme.
My question: If I’m going to paint the skull, do you have any recommendations on whether I should use something like Killz or lacquer, anything like that, before I start painting?
I realize this may not be something you’ve considered, but I thought I’d ask.
Thank you kindly.
Diane
May 7, 2020 at 8:10 pmPeople usually only use lacquer to protect the bone from getting dirty/absorbing dust, etc. So, there really isn’t any point to put on a lacquer before painting it since the paint will also protect it. Plus, bones are absorbent so the paint might not stick as well if you lacquer it first. On the flip side, if the skull is really old and extra porous, it might soak up a lot of paint or soak it up in a weird way. The texture might also end up looking weird because of all the pores showing through. In this case, it *might* be worth doing a lacquer before painting, but I’d still say it probably isn’t worth it.
And, for best results, make sure the skull is completely dry before you start painting. Good luck!
Clay Bonnyman Evans
May 7, 2020 at 8:34 pmThank you, Diane. I’ve been drying the skull in sunlight for a couple of days and probably won’t get around to painting it for awhile yet. It looks very similar to the skull in your piece above.
Lonnie Blakely
July 15, 2020 at 4:19 pmDo you rinse of the 40 percent hydrogen peroxide I paint on my deer skull or leave it on and let it dry
Diane
July 16, 2020 at 6:41 pmIf you are talking about the clear hydrogen peroxide, then there’s no need to rinse it off. Just soak the bone in the solution and let it dry; the hydrogen peroxide will evaporate into the air. Once dry, you can paint the skull or do whatever you want with it. If you use cream hair developer for whitening though, it will leave a crusty residue which you will need to rinse off.
Anastasia Gochnour
July 29, 2020 at 8:07 pmHello: I’ve just tried two rounds of the peroxide/water bath that you recommend to whiten a deer skull. Unfortunately, it remains as yellow as before and does not seem to be whitening at all. We found the remains of this deer and then did a slow maceration process to remove all the tissue. It is all cleaned and initially became quite bleached by the sun; however, after a couple weeks, the skull became yellow. I’m wondering if you have any additional recommendations. It’s hard to believe that just repeating the same baths will eventually lead to better results since it doesn’t seem to be causing any reaction. Thanks and hope to hear from you!
Diane
July 30, 2020 at 12:41 pmIf it was initially white and then turned yellow, it is probably fat causing it to turn yellow. Try soaking it in soapy water and seeing if the water turns nasty or little globs float up. I wrote about that in this post – /how-to-degrease-bones/
Syd
August 31, 2020 at 10:06 pmHi. I have recently come across a cow jaw bone. I have cleaned it but not degreased or whitened it yet. one side seams fairly normal but the other is a greenish/blue. Just wondering if you knew how this occurred.
Diane
September 1, 2020 at 9:38 amThe two most likely reasons for the blue tint are:
1) Algae. If this is the case, it should come off after whitening with hydrogen peroxide.
2) Chemical reaction with minerals in the bone and water. For example, there may be copper leaching into your water from somewhere. I’ve heard of semi-professionals having issues with this because there were copper elements in the heating tanks they used for maceration. I’ve also once heard of someone’s skull getting greenish because the chlorine in the tap water reacted with blood in the flesh. In this case, the most-common solution is to soak the green skull in some white vinegar for a few hours and then rinse. Vinegar de-calcifies bones though, so you can’t leave them in for more than a few hours or the bones can get flexible, flaky and weak.
Sarah
September 5, 2020 at 5:38 amYou are amazing, I have no questions after reading your detailed responses to so many questions, and yet I am curious enough to purchase your book anyways!
I’ve now done a few ‘skype a scientist’ programs for classrooms. If your daughter is interested in zoology, I research penguins and am happy to chat (they have some beautiful bones!)
Diane
September 7, 2020 at 9:51 amWhy thank you 😀 I just Googled penguin bones (oddly that’s one animal we haven’t thought to look at and definitely don’t have around us). They are beautiful. Their scapulae are massive!
Charis
October 9, 2020 at 2:33 amThis is such a great comment thread. I couldn’t stop reading the various questions and your thoughtful responses. I came here to ask a question about cleaning animal teeth. My nephew and I are trying to clean bear teeth that separated from the skull. I’d like to sterilize the fang so he can make it into the jewelry he’s envisioning. I’ve successfully cleaned & sterilized bird bones in hydrogen peroxide. Is it the same process for cleaning teeth? Or would you recommend something different?
Diane
October 9, 2020 at 9:18 amIf you are just worried about disinfecting, then soap and water will be enough for the teeth. If you are really worried about bacteria, then you can even lay them out in the sun for a bit so the UV rays kill any lingering pathogens (though honestly the other things we touch in life are probably worse than what’s left on the teeth at that point…).
Some people prefer the natural color of teeth so don’t use hydrogen peroxide. If you want the teeth to be brilliant white, then use hydrogen peroxide. A short soak in a mild solution should be fine. Dentists apply Hydrogen peroxide to teeth and then expose them to UV light afterwards to “activate” the H2O2. If you’d rather they were still a bit natural in color, then don’t bother with the hydrogen peroxide. 🙂
Terri Villa-Engelkens
October 29, 2020 at 5:22 amHi, I was so excited to see your advise on cleaning. I have cleaned my little bird bones as you suggested but wondered if I should spray with some kind of clear coat to keep from discoloring in time or getting dirty.
Diane
October 29, 2020 at 10:25 amThere’s a lot of argument as to whether you should coat them or not. Most varnishes will make the bones look too shiny. They also often have a yellow tint or start to yellow over time. However, there are some matte sprays that many taxidermists use to coat bones. Krylon Matte Spray is the most popular (see here: https://amzn.to/31TwB19). Or, if you don’t mind the shininess and are careful to prevent the bones from sticking together, just dilute some glue and brush on a thin coat of it. 🙂
Oliver
November 30, 2020 at 12:47 amHello. I have been referring to this page for years in the odd, rare case that I find and clean bone. I usually end up working with bone from food animals like rabbit and turkey.
Today, however, I found the bottom jaw of something I suspect to be a opossum or raccoon. It seems fairly fresh, had a tiny bit of flesh on it still, but otherwise was clean aside from needing washed.
I washed the pieces and found the teeth, or rather the molars in the farthest back part on the jaw, are an odd purple-grey colour. Will this be remedied with decreasing and peroxiding or is this something else?
Should I soak and attempt to remove the teeth and clean the sockets and tooth interiors?
Diane
November 30, 2020 at 1:05 pmThe purple is probably blood vessels/nerves that are still in the teeth. I had HUGE bits of blood tissue come out of molars in larger animals — even after they seemed clean. There is probably a big nerve going through the length of the jaw too (which you won’t be able to see). Since there was still tissue on the jaw when you found it, I’d recommend soaking it in water for a few days. You’ll be surprised to see how fast the water gets gross. Just let it get gross for a few days (at least) as the bacteria in the water will eat away any remaining tissue. You can also poke wires into the foramina (holes in the bone where nerves go through) to poke out nerve tissue. Dump the dirty water and soak again. Once the water is cleanish, then you can proceed to degreasing – opossums tend to be VERY oily. Then you can let the jaw dry and proceed to whitening.
Just be sure that you catch any teeth after soaking. They are so easy to lose! I always strain through a dish towel or cheesecloth.
Lauren
December 11, 2020 at 2:25 pmHelp. I followed this for a sea bone, it’s like a whale vertebrae. And it’s still not very white and still kinda smells. And I just realized, what if there’s a different process to clean sea bones than land bones? Also I’m not sure if I did the degreasing part correctly or if my bone is just so decomposed it’s not gonna not smell? If that makes sense. Please let me know, thanks
Diane
December 11, 2020 at 3:46 pmHey. Read through the comments. A lot of other people have had this same issue with sea mammals. I gave some advice in the comments. It makes sense: they have thick layers of blubber to keep them warm. On top of that, vertebrae are usually pretty greasy too. You’ll have to spend a long time degreasing. It might be worth investing in some professional degreaser from a taxidermy shop.
Kolbyn
March 8, 2021 at 8:37 pmI have a question. I am a 17-year-old going into taxidermy and I am doing a skull right now that the guy shot it in the upper mouth and the Suter lines are like a dark reddish blackish color and I was wondering how I can get those out? Also, have you tried toothpaste?
Diane
March 9, 2021 at 2:05 pmMy best guess is that the dark reddish lines are probably blood that got into the bone. The stains should come out with hydrogen peroxide but might take a few tries. You can treat the entire skull and then spot treat just the stained area. I haven’t tried toothpaste. I doubt that would work. :/
Jace
March 10, 2021 at 1:56 amHi! I’m working on some deer bones from roadkill I found about a year ago and I’m pretty close to the bleaching stage. I only have access to 3% hydrogen peroxide, will that work? Also, do you have any suggestions for how long to leave it soaking since it’s so diluted?
Diane
March 10, 2021 at 9:33 amThe 3% hydrogen peroxide will work – though you’ll need a lot of it to do a deer. It will still work even though it’s diluted. Just don’t expect it to be super white or anything. Hair developer is really cheap and readily available. If you don’t like the results with the 3%, you can get some of that and use it to do another treatment or just spot-treat any stains. As for how long to leave the bones soaking, leave them for a day or two. There’s probably no point to leave them soaking any longer since the hydrogen peroxide will be “finished” working after that long.
Alyssa
June 2, 2021 at 7:44 pmHi there! I recently bought a pelvis which was pre-cleaned, mostly, but a bit dirty and dingy. I cleaned it up following your guide (which was very helpful!). But – even after a dishwater bath AND an h2o2 soak, it’s still got concrete mites on it!! Tiny little red mites that I can’t squish for fear of staining the bone, but that KEPT reappearing after ANOTHER bath and soak. Do you have any tips or advice on this problem? The mites aren’t harmful or anything, just gross and annoying, and I’d love to be able to display or use the bones without the little bastards crawling all over it. I can’t find any other advice on this, so I figured I’d try asking here. Thanks in advance!
Diane
June 3, 2021 at 10:43 amWow! That’s a tough one. I’m guessing that they keep reappearing because they laid their eggs inside the pourous bone. I’d try to blow all of the mites off (or vacuum them, but then thoroughly clean the vacuum bag). Once the live mites are gone, do another H202 soak, which will *hopefully* kill any remaining eggs inside the bone. Ideally, so long as you kill the hatched mites before they’ve had time to lay more eggs, then no new ones should appear. Good luck!
Abbey
October 5, 2021 at 11:40 pmHello! Thank you so much for sharing so much wonderful advice! My wonderful dog had to have her rear leg amputated a few months ago, and I decided to keep it! Interestingly, her oral flea/tick prevention (Bravecto) actually seemed to kill dermestid beetles. So, I removed the flesh by putting it in warm water and dish soap on the “keep warm” setting of a crock pot from goodwill, it worked! Most of the tarsals are looking good, but it’s taking forever to degrease the long bones (half a femur down). Also, there are so many little tiny ones!! Do you articulate the little sesamoids or do you not deal with them? Regardless, thanks for the help!!! P.S. My dog is happy as a clam hopping around with 3 legs ☺️
Diane
October 6, 2021 at 11:35 amYou’ll probably go crazy if you try to articulate all of the tiny bones. There is a method called a “ligament mount” where you basically leave the ligaments in place (don’t let them macerate) so they hold the bones in place. It’s very difficult to do and I am definitely not an expert on that.
Marcye Shayer
June 25, 2021 at 5:22 pmI would love to buy a hard copy (or paperback) of this book but can’t find it anywhere??
Diane
June 25, 2021 at 8:24 pmBecause there are a lot of photos, it would cost a small fortune to print hardcopies of the book. Hence why it is only available as PDF. You could always print it yourself (in color or black and white) – I didn’t put any of those annoying protections on the PDf which prevent you from doing so. 🙂
Isabella-Rose Anderssen
July 6, 2021 at 6:26 amHello!
I’ve got a number of sheep skulls, birds, foxes, cows and horse skulls that I’ve collected over the past few years and I’m looking to clean up, paint and sell them. None of them have ever been buried and the majority of them are clean of flesh but a couple are still really smelly. Would that be from sitting outside and getting dirt and crap inside them? What would you recommend? I also have s couple that a really white and clean with no smell. Do I need to use hydrogen peroxide or just use soap and warm water?
Thank you so much for this page, it’s helped a lot! <3 😀
Diane
July 6, 2021 at 2:37 pmIf they are smelly, then there is probably some fat or funky stuff (for lack of a technical word :)) in them. I’d give the smelly ones a nice gentle scrub wtih soap and then do a hydrogen peroxide bath. Let them completely dry. If they are still stinky, then you will have to degrease them. The white/not stinky ones probably don’t need anything done to them.
Quartz
October 22, 2021 at 7:26 pmI used your trash bag in a bucket of water method to whiten a moose skull. The solution didn’t make it past the antlers. Is there an easy way to whiten the remaining portion to match the bottom 2/3 of the skull? Is it possible to match it using the peroxide paste on the remaining portion, or is there a better way? Thanks!
Diane
October 23, 2021 at 10:49 pmI’ve had success with the hydrogen peroxide paste method. Depending on the color difference, you may need to do it multiple times. At least the paste method doesn’t use much H202 though, so you won’t have to spend a fortune on peroxide for multiple whitenings. Good luck!
isabel
November 11, 2021 at 12:23 amthank you so much!!! this is so helpful and i love how you included multiple ways of doing it. your before and after pictures are astounding!! (also half way through i realized i have the same name as your daughter and that we both love bones!! funny coincidence 😆)
Jeff
December 5, 2021 at 10:45 pmI have a old steer skull, maybe 10 to 12 years old, that was in a barn it had some dirt , dust and had bird poop on it. I washed the skull in water and it cleaned up very nicely but it has yellow spots from the bird poop. Other than the yellow spots the skull has great color to it. I’m considering doing a few test spots with paste but concerned I will then have white spots on it. Suggestions? should I just whiten the whole skull.
Diane
December 6, 2021 at 4:22 pmYou’ll probably just need to whiten the entire skull. If the yellow spots are really bad, then you can spot whiten afterwards.
gary akers
December 16, 2021 at 5:48 amhave you tried the 50 volume !
ALEXANDER
January 15, 2022 at 1:12 amHello. Very interesting.
I find that making a hot water bath to a jar with 3% hydrogen for 3 to 10 min speeds the process immensely.
Also, by mistake, I have covered the treated bones in table salt. Being snow white after hydrogen hit bath, they turned yellow in a matter of minutes. I guess I found the way of getting the fat out.
Thank you
Diane
January 20, 2022 at 6:06 pmHeating hydrogen peroixide definitely speeds up the process. If you are careful, you can even do it over a portable gas stove. I’ve tested it and it works well. But I’m too lazy to do that on every bone though and just let them soak. 🙂
And I’m going to test that with the salt. Thanks!
Omar
January 27, 2022 at 12:09 pmHello, I found this mummified brown bat skeleton on the sidewalk and was wondering on the best approach with removing the tissue. Any suggestions?
Diane
January 27, 2022 at 4:09 pmSpeaking from experience, bat bones are TINY and FRAGILE. Even once you remove the tissue, it is really hard to sift the out the bones from all the fur. If you are new to this, try to have realistic expectations of how many bones you’ll actually be able to get. You might want to just try to get the skull. A fully-articulated skeleton is going to be tough.
Normally, the best method for tiny animals is the “carcass in a box” method. You basically put the dead animal in a plastic box with some holes punched in. The holes allow flies to get inside and lay their eggs. Then the maggots eat away all the tissue. Bacteria also eat away at it. Several weeks later, you’ve got a clean skeleton (though still a lot of fur to deal with).
Since your skeleton is mummified, you’d want to soak it in water first to rehydrate it. You could then try the box method. Or, if you don’t get grossed out easily, just let the entire mummified carcass soak in water (it could take weeks). Bacteria in the water will eat away the tissue. Again, it’s tricky to get the tiny bones out of the nasty water. This post has more details: /remove-tissue-cleaning-animal-bones/
Bee
March 5, 2022 at 12:48 pmHi! First I want to say I’ve loved reading through a load of this page, I can’t believe I’ve never found this because I’ve been cleaning bones for years and you give amazingly clear advice.
Even though I’ve been cleaning bones for years I’ve just made a really dumb mistake though, I forgot to turn the heat off on a dog skull and some vertebra that I was soaking on low heat (it’s never reached simmer/boil while I was supervising it) and accidentally left it on over night! 🙁 When I went to change the water this morning thinking it had just been cold soaking over night (to degrease) I found it simmering and I’m worried I’ve damaged the bones too much! bits of the skull, especially damaged bits and the tooth sockets are softer, the bone looks very dry but also a lot of fat has come to the surface.
I can’t find any advice on what to do, so I’m hoping you’ve got some experience that could help me, though it seems from everything you’ve said about boiling bones (I know, don’t!) you’ve definitely never done it on purpose and you don’t seem like the kind of person to make such a silly mistake.
Basically I’m wondering what I can do to treat the bones now that won’t dehydrate them any more and might help them keep some integrity?
Diane
March 7, 2022 at 9:34 amDamn, that’s a tough one. Vertebrae are tough, so might survive the physical damage from extended simmering. But vertebrae are also reallllyyyy greasy, so you maybe trapped a lot of grease in there with the simmer instead of bringing it to the surface. Once they dry, I’d do a H202 bath on them — the H202 will let you see if there are any greasy spots. If there is a lot of greasy/yellow/shiny spots, you might need to degrease with something more hardcore like ammonia.
As for the dog skull, you will just have to see how damaged it is and whether it will fall apart. After whitening (and letting it completely dry), you might want to paint it with a coating (watered down white glue is the cheapest option). The coating will prevent flaking and keeep the parts of the skull from falling apart.
Linda Guy
March 6, 2022 at 11:21 amHello, and thank you for all the wonderful information and advice posted here. My question is…I found a deer skull, old, dirty and green from moss buildup. It was however pretty white from being in the sun I’m guessing. I cleaned it with dish soap and then soaked it overnight in regular hydrogen peroxide. When I took it out it had turned a pink and bluish color with the green (from moss or mildew) still present. So now I have this mottled Easter egg looking skull. I let it dry all day in the sun, no change. Should I continue trying to soak it? I can’t find anywhere online what would have made it turn pink/blue. And there’s quite a bit of green staining. Thanks for any suggestions. 😊
Diane
March 7, 2022 at 9:22 amThe green staining from moss/mold can take a few soaks to get rid of.
As for the pink: I’ve heard of this happening with bones before (it’s never happened to me though). The reasons are likely this:
-The hydrogen peroxide can react with blood left in the skull and cause it to turn weird colors
-The hydrogen peroxide might have stabilizers in it which cause the discoloration.
I recommend this fix:
-Soak the skull in hot water for a day or two (you’ll need to change the water a few times so it stays warm). This will help flush any blood out.
-Use a different brand of hydrogen peroxide. Preferrably a “clear” one meant for hair as these usually won’t have stabilizers in them. They are stronger than the stuff you get at a pharmacy too.
Some people have had success using “Iron Out” to treat blood stains on bones. I’ve never tried it though since I never had any pink spots. There is some good info about this issue here: https://www.taxidermy.net/threads/405579/
Another (less likely) reason is that some pink bacteria grew on the skull and stained it. In this case, you could soak it in ammonia (from a hardware store). Then you do another hydroge peroxide bath, or paint it onto the skull. The H202 will whiten the bacterial staining.
*I’m going to have to write a blog post on this. You aren’t the only one to have discoloration issues 🙂
Sally
March 7, 2022 at 6:11 amI want to paint a deer skull, any tips I need to know after I clean the skull?
Diane
March 7, 2022 at 9:11 amJust make sure it is really dry before you paint. Otherwise the paint will trap moisture inside. 🙂
Bonnie
March 27, 2022 at 11:22 pmThank you so much for sharing your knowledge! I’ve been looking for info on cleaning a smaller delicate skull I found on a hike. I think it’s great your daughter is into bones! I am into bugs and people are so weird about it. I feel sorry for them and their hang ups!
Diane
March 29, 2022 at 2:51 pmYea! More insect people. Beetles are my favorites and I’m always picking them up. 🙂
Jessie
April 11, 2022 at 9:37 pmhi Diane☺️ I was wondering if you knew how to remove white mold from bones that have just been macerating. I thought it would come off when scrubbing with dish soap and a toothbrush but it’s really stuck on there. Will the peroxide eat this mold up do you think?
Diane
April 12, 2022 at 1:28 pmThe hydrogen peroxide should do the job. It might take a few soaks or a soak in extra-strong H202 to get stains off though. Though, if it is white and slimy, it might actually be some tissue left on and not mold. I’m doing a cow spine right now and there is a LOT of nasty white slime from the spinal discs as well as cartilage. Hot water breaks it down, but it is going veryyyyyy slow.
Henry
August 17, 2022 at 10:38 pmHi,
Got an African buffalo skull with the horns still attached. Soaking the skull in water and dish soap to remove any mummified flesh and remove grease (as it still smelled). I didn’t think I could remove the horns, but I have avoided soaking them for fear of damage. However this means I can only soak the lower part of the skull. Equally, do the inside cores of the horns need to be treated? Any help would be greatly appreciated.
Diane
August 18, 2022 at 9:05 amThere is definitely gross gunk inside those horns! Basically, you need to remove them, clean the insides well with baking and store the horns in baking soda or borax until the skull is done.
See these posts: https://www.taxidermy.net/threads/106146/, https://www.taxidermy.net/threads/427112/, https://www.taxidermy.net/threads/435284/#post-2829580
You can also find tons of other info on how to remove the horns in those forums.
Andy
October 8, 2022 at 7:59 pmAt what point can I handle the bones with my bare hands?
Diane
October 12, 2022 at 11:54 amI’m kind of lazy about wearing gloves when working on bones. I actually handle them with my bare hands at pretty much any point (not when there is lots of rotting flesh on them though — that grosses me out!). For example, if I find a cleanish skull in the woods, I’ll pop it into a plastic bag to take home without putting on gloves. You’ve just got to be very careful to wash your hands afterwards and not touch your eyes or similar. Warning: your hands can end up SMELLING like decaying flesh if you don’t wear gloves! Also, be careful to clean bones you find in the woods BEFORE bringing them into the house — that’s how I’ve released lots of beetles into my bathroom! 😀
But, as far as sterilization goes, the bones will be completely safe/sterile after getting a nice dunk in hydrogen peroxide. 🙂
Andrea
October 21, 2022 at 2:15 amHi Diane and thank you for this wonderful post!
I found a deer skull that is clean and the brain is dried out and rattles when shaken. There is no smell.
Would it be best to avoid soaking the skull and just use the peroxide cream instead? I’m concerned about rehydrating the brain and the possiblity of it then starting to smell.
Thank you!
Diane
October 25, 2022 at 9:01 amFirst see if you can somehow scrape the dried brain out. But, even then, you’ll still need to soak — there are probably bits of dried brain stuck inside and you’ll need to soak the skull to get them out. Otherwise, it might start “rehydrating” on a humid day and you’ll get some nasty stink.
Jane Small
November 27, 2022 at 9:10 amHi
Thank you for your bone cleaning instructions. I have a ram skull with big horns. I have soaked off all the flesh and goo for months in a huge bucket but I can’t get the horns off. How do I do it? HELP!
Thank you
Jane
Diane
November 29, 2022 at 12:21 amYes, those can be tough. I’d suggest the “double bag method” https://www.taxidermy.net/threads/327099/. If that doesn’t work, it might be because there is tissue inside which hardened and basically glued them in place. You can try soaking them a bit (read: https://www.taxidermy.net/threads/427112/) but make sure you’ve gotten any membranes holding them in place off first (read: https://www.taxidermy.net/threads/435284/#post-2829580).
Noah
February 18, 2023 at 9:01 pmHey, great article! Love to see such comprehensive coverage with good advice. But have you heard of 3% peroxide wearing bone down? I’ve processed a fair amount of skulls but did a cat leg for a friend. Not used to having so many small bones. It sat in 2.5 QTs of 3% (brown bottles), undiluted, for 5 days. It sat for so long/with so much liquid because I was tired from work and it was with a deer skull. Pores are rounded off now and the bone’s almost chalky. I knew higher peroxide concentrations could do this but didn’t think 3% would, even if left way too long, like mine. Any insight on this or ideas where I could get more detailed info? I’ll be sure to stick to ~24 hrs in the future, but unsure if I did anything else wrong (airtight container, heat from the deer skull, etc). Basically I want to understand the threshold for when this could happen better.
Diane
February 22, 2023 at 12:40 pmI’ve never had anything like that happen — and I often leave bones to soak in higher percentage H202 for days (it sometimes takes me a while to get around to them or I just get lazy). Maybe the cat had a disorder which caused brittle bones? Or maybe the tissue was cleaned off the bones in a not-recommended way, like someone added a caustic agent to the water when macerating. :/
Nathaniel
March 29, 2023 at 1:28 amHi Diane. Thank you for the great article!
I recently found a skull in a river and it is a nice green color. I soaked the skull in dawn soap and water, cleaned and scrubbed all the mud off, and am now soaking it in 3 percent peroxide. The green is still there and I kind of like it but am wondering if this is a bad idea? How do I know if it’s just a stain and not bacteria that’s eating or damaging the skull?
Diane
March 29, 2023 at 9:30 amI can almost guarantee you that the green stain is from algae in the water. The reason the H202 didn’t get rid of it is because it was only 3% strength (which is really weak). If you like the color and the skull doesn’t smell, then just keep it like that. If you want to get it lighter/whiter or it’s stinky, then do another soak in the H202.
Nicolas
March 31, 2023 at 8:20 ami would like to clean bones for food presentation as a plate if you will? can i use this technique and serve food on the bones? like sliced short ribs on a cleaned up short rib bone?
Diane
April 4, 2023 at 10:27 amHydrogen peroxide will disinfect the bones, so there’s no reason that you couldn’t serve food on them. However, you’d need to coat the bones with some sort of food-safe epoxy/enamel afterwards. Otherwise, the grease/juices/etc. from the food will absorb into the bones (bones are very porous!!!). Then you’d have nasty stains on the bone plate. And the food residue might start to grow bacteria, get stinky, etc. I’ve never done anything like that, so unfortunately can’t recommend any brand of food-safe coating.
Danii
April 3, 2023 at 11:23 amDo u need to keep it Cold or can u keep the peroxide bath with a skull in the sun?
Diane
April 4, 2023 at 10:24 amH202 actually works better when it is warm. You can even simmer (not boil!) bones in H202 to get them whiter. I personally don’t find that worth the effort though. A soak in cold H202 will also get them white. So don’t stress about temperature of the H202 water. What DOES make a big difference is this: After you are done soaking the bones in the H202, put them in the sun to dry. The UV rays will improve the effects of the H202 so they get even whiter.
Alex
June 9, 2023 at 7:00 pmI found boiling the bones in a 35% peroxide 1:1 water bath worked magic. I had an old cow head that had so much dried meat and tendons and eye sockets even. Almost mummified. Bad shape indeed. but after getting sheaths off and boiled then pressure washed the meat off, I then did the bath. If it wasn’t going to come off, i was going to let it sit in gasoline barrel for a week. Anyhow, didn’t need to and waiting on some diamond paste in the mail to finish polishing the horns after sanding by hand. I hope this information helps and you have success with your project!
Joan
July 6, 2023 at 4:38 amI have an elk skull with a full set of antlers, I buried it a year ago and just dug it up. The skull is clean of meat and doesn’t smell but is not uniform in color. How do you suggest whitening the skull without doing the antlers? I want to keep the antlers dark. Thanks for any suggestions, I know this will take a lot of work. I’m planning on painting the skull with Indian designs.
Diane
July 6, 2023 at 12:48 pmI have this post on the topic: /how-clean-antlers/
I’d go with the “paste method” where you mix hydrogen peroxide with baking soda and spread it over the skull. You can also use cream hydrogen peroxide (the one that hair salons use) but I prefer the first method.
Brian
October 30, 2023 at 12:04 pmWould this work on turtle shells
Diane
October 30, 2023 at 12:35 pmTurtle shells are really difficult. There are two issues. First, the shell is covered in scutes. These are not bone material. it’s more of a fingernail type material (like with animal horns). The scutes are delicate and can dry up and fall off. I’ve heard of people saving the scutes and glueing them back on, but the scutes on my one turtle shell curled up and couldn’t be reattached. Depending on where you found the turtle shell, the scutes may already be gone.
The second problem is that the turtle shell may fall apart. It’s practically impossible to put the shell back together if this happens. Even experts can’t do it easily since the “puzzle” has to be reassembled from multiple angles at once.
That means you should NOT macerate the turtle to remove any tissue as this will weaken the collagen holding the pieces together, causing them to fall apart. A better bet is to let insects or dirt microbes eat the flesh — but some of these will eat the scutes if you are trying to save them.
If the turtle shell is already clean of tissue and doens’t smell, I wouldn’t do anything to it. If it’s free of flesh and the scutes are gone, then you can whiten it with hydrogen peroxide.
Emma
February 13, 2024 at 4:40 amHi Diane!
This is such an informative article. Although it’s from some time ago, I was hoping that you might still see this comment and reply.
I have recently received some antique bone buttons (likely dated to 1850-60s) and while some of them are quite white, others are not. None of them have a smell. For the buttons that are shades of yellow/brown/grey, do you think that whitening them with H2O2 would be sufficient? Should I also give them a pre-soak/scrub with dish soap? I’m a bit concerned about ruining them, but I also don’t want any oils that may be in the bone to seep into the fabrics and I end up attaching them to.
Diane
February 13, 2024 at 1:55 pmHi. Sorry I missed your comment. Soaking in hydrogen peroxide should be adequate. The discoloration is probably just dirt/dust/gunk that built up over time. I’d still do a test run with just one of the buttons first since they are antiques and obviously not easily replaceable. Note the soak time so you can use the same time on other buttons of the same level of discoloration. It can be tricky to get them all to be the exact same shade of whiteness.
Emma
February 14, 2024 at 4:19 amNo worries, you didn’t miss anything! I just meant that I hoped you were still checking comments on this post from several years back 🙂
Thank you so much for your reply — I will give it a go and keep track of my variables.