
As a mom who goes wild camping in remote areas with my young daughter, I take my backpacking first aid kit seriously. Injuries like sprains and fractures are very common in the backcountry. Even minor first aid issues like diarrhea or a nasty blister can completely ruin your trip.
But here’s the issue when building a backpacking first aid kit: how do you get all the items you might need without weighing down your pack?
Over the years, I’ve tweaked my first aid kit quite a bit, removing unnecessary items and including more multi-purpose items to cut back on weight. Below is the first aid kit setup I’ve ultimately settled on.
Notes:
- This first aid kit is designed assuming it might take you 1-3 days to get to civilization or for help to get to you. For example, if you got a viral infection, the meds would sustain you for a couple of days of rest until you got better enough to trek to town.
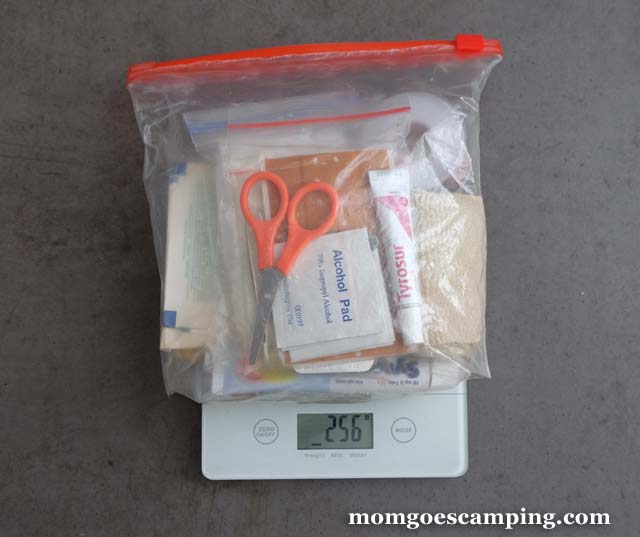
- This first aid kit weighed 9oz (256g) when completely packed. Yes, this is fairly heavy for a lot of ultralight backpackers. You can easily cut down weight by using half-full tubes of ointment.
- If I am traveling in undeveloped countries, I bring this complete travel first aid kit. It has a lot more items but is still lightweight enough for a backpack.
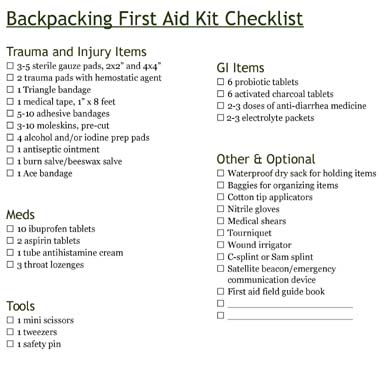
Backpacking First Aid Kit Checklist
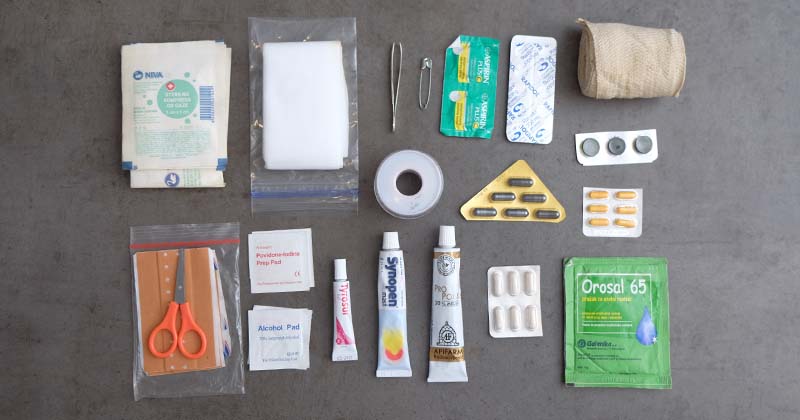
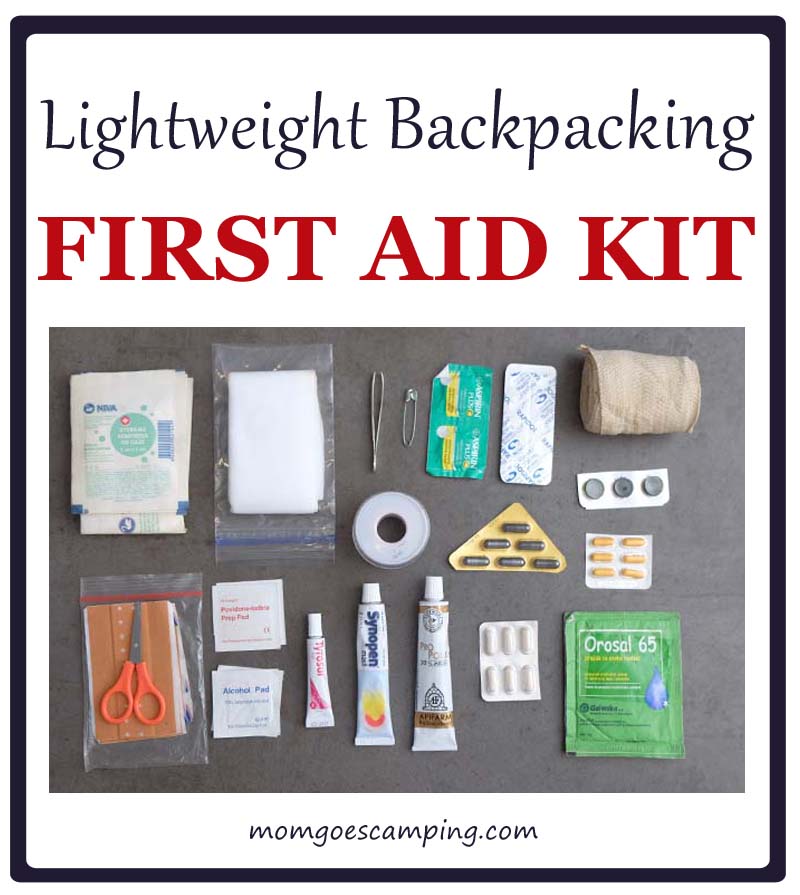
Here is a list of all items in my backpacking first aid kit (Get a printable version here). I’ve broken the items into categories based on what they are used for. Keep reading for an explanation of each item and how it is used for backcountry first aid.
I keep the items organized in little baggies by what they are used for. For example, all the GI (gastrointestinal) meds are kept together. It makes it much easier to find items when I need them.
Below is what my first aid kit looks like organized in baggies.

I put all of this into a sturdy zip baggie. If I were doing more hardcore backpacking with stream crossings, I’d get a waterproof dry sack to keep it in. This dry sack has enough space for a first aid kit plus other important gear like headlamps. For my purposes though, the zip baggie works fine.
Below is what the first aid kit looks like all packed.
1. Sterile Gauze and Trauma Pads
Trauma pads, which are often impregnated with a hemostatic (blood clotting) agent, are used to apply pressure to wounds to stop bleeding. Sterile gauze is used to make a dressing. You can also use normal sterile gauze — or any absorbent fabric you have available, like your shirt — to apply pressure. Once bleeding is under control, you would use sterile gauze to make a bandage over the wound.
First cover the wound with copious amounts of antiseptic ointment (in #4). The ointment prevents infection and keeps the gauze from sticking to the wound. Otherwise you’d break clots and restart bleeding when you went to change the dressing. After ointment, apply the gauze over the wound and hold it in place with medical tape (#2) or a triangle bandage (#3).
While I’ve never had to use trauma pads or gauze on any backpacking trip (knock on wood!), if I were to need it, I would really need it. So this is not something I’m skipping in my first aid kit!
2. Medical Tape
Medical tape is a great multi-purpose backpacking item with numerous first aid uses. Here are the main uses:
- Hold gauze in place to make a bandage. Especially good when you have a wound in a weird place that Band-Aids will come off of.
- Treat smaller wounds by applying tape right over them. This is what I did when I cut my feet up walking barefoot while beach camping. Medical tape will stay in place for days or even weeks, even when it gets wet.
- Blister prevention and treatment. If you feel a hot spot and think a blister will form, put a strip of medical tape over it. You can also tape right over blisters to prevent them from popping.
- Holding a splint in place. Wrap the medical tape around the splint padding. You don’t want medical tape touching the skin in a broken bone situation.
- Making butterfly bandages: If you get a deep, narrow wound (like a knife wound) which probably requires stitches, you can use medical tape to make butterfly bandages. These hold the pieces of skin closed. See the image. You’d still need gauze over the wound to keep it clean.
You can also use medical tape for random things, like fixing tent poles or patching holes in gear. Duct tape works better and can also be used for first aid, but I prefer medical tape.
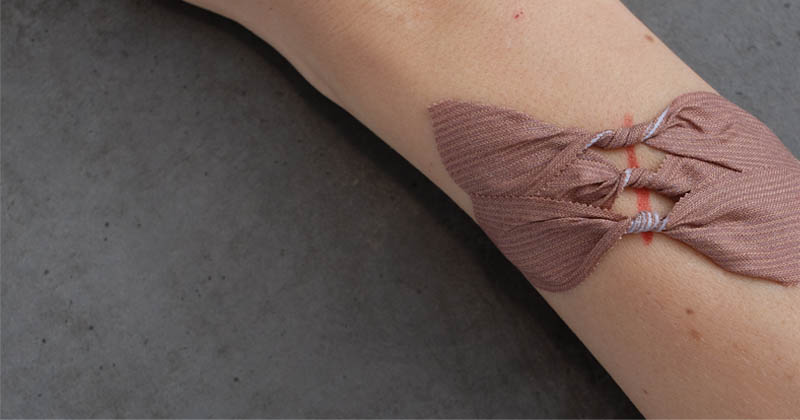
Image shows medical tape twisted into butterfly bandages for holding gaping wounds closed.
3. Triangle Bandage
A triangle bandage is another multi-purpose first aid item you might need while backpacking. If you bring a bandana or scarf, you might be able to skip the triangle bandage in your kit.
Uses for a triangle bandage include:
- Impaled objects: If an object gets impaled in your body, you generally shouldn’t remove it. Wrap the triangle bandage around the object to stabilize it while getting to help.
- Making a sling
- Tie a splint in place
- Bandage head wounds
- Eye patch
- Improvised tourniquet

Image shows how you’d treat a broken forearm or wrist. First the fracture is splinted, then a triangle bandage is used to make a sling. The arm is further immobilized with a swathe, which can be made from any long bandage or piece of cloth.
4. Minor Wound Kit
This baggie contains:
- Adhesive bandages
- Moleskin for blisters
- Scissors
- Antiseptic ointment
- Iodine and alcohol prep pads
- Tweezers: For cleaning debris from wounds and removing ticks.
- Safety pin: For removing splinters and thorns. Can also be used to pin a triangle bandage into a sling.
Some of the adhesive bandages are Band-Aids in various sizes. I also have some which can get cut to any size – hence the mini scissors. You could use your knife or multi-tool to cut bandages instead of the scissors, but I like to have clean scissors ready in the first aid kit. My daughter also uses them to make nature arts and crafts while we camp.
5. Burn Ointment/Beeswax Salve
I used to worry about my daughter falling into the campfire and getting burned. So, I brought along burn ointment. Now that she’s older (and I’m less worried about serious burns), I have switched to bringing a beeswax salve. I get my salve from some local beekeepers who make it. There’s an equivalent product on Amazon you can get here. It comes in a container instead of a tube though, so you’d want to bring some Q-tips/cotton tip applicators for applying it to a wound.
The salve is amazing for lots of things, including:
- Burns: Apply a generous amount over a burn before putting on a bandage. The salve helps healing and keeps the bandage from sticking to the burn, important so the bandage can be changed without ripping newly-formed skin.
- Skin protection: When backpacking in winter or cold, windy conditions, apply a layer of salve over all exposed skin. It will keep it from getting dried out and cracked.
- Sunburn
- Lip balm
- Dry skin
6. Bite/Itch Cream
This should be self-explanatory. Seriously, backpacking is much more enjoyable when you aren’t scratching your skin until it bleeds!
7. Ace Bandage
Sprains are one of the most common backpacking injuries. If you want to same weight and space, you can use medical tape to bandage a sprain instead. Here’s how to do it. It doesn’t provide the same level of compression or padding though, so I bring the Ace bandage to play it safe.
8. Medications
Getting a fever when backpacking could really wipe you out. It isn’t exactly life-or-death, but these meds can make your trip more enjoyable. I’ve included:
- Aspirin with vitamin C: For pain and headaches
- Ibuprofen: For pain, headaches, and fever
- Throat lozenges: I only bring along three. Helpful when the cold mountain air dries out my throat.
9. GI Kit
Does your water filter treat viruses? Do you thoroughly wash your hands before eating on the trail? Are you careful about hygiene when backpacking? Probably not. So it’s very possible you could catch a stomach bug.
Speaking from experience, GI issues while backpacking are absolutely no fun – and it’s hard to follow Leave No Trace when you are puking all over the trail! I’ve got a baggie which can help solve GI issues.
The GI kit includes:
- Electrolytes: Diarrhea and vomiting cause dehydration, which can be incredibly dangerous. Electrolyte packets can literally save your life if you get a stomach bug and can’t keep water down.
- Probiotics: When a stomach bug comes on, take these to alleviate symptoms and speed up recovery.
- Activated charcoal: Very good for suspected food poisoning or infections. My tablets also have various herbs which help with gas and upset stomach. *Don’t take activated charcoal at the same time as other meds. The charcoal will absorb the other meds, making them ineffective.
- Anti-diarrhea meds: In general, it’s better to poop like crazy instead of taking these meds because diarrhea is the body’s way of expelling harmful pathogens. And you should never take these if you have bloody stool. But they are a good backup item in case you are a day’s hike from help and don’t want to crap your pants along the way.
Additional/Optional Items
Depending on the type of backpacking trip and the number of people coming, you might want to include some of these additional items.
- Q-tip/cotton tip applicators. I used to bring these but stopped since my antiseptic ointment comes in a tube and I can just squeeze it directly onto a wound.
- Nitrile gloves: Wear to keep wounds clean while administering first aid or changing dressings.
- Medical Shears: For quickly cutting clothes away from a wound.
- Tourniquet: You can improvise a tourniquet out of a triangle bandage, bandana, torn shirt, etc. However, improvised tourniquets don’t apply nearly as much pressure as approved ones.
- Splints: Such as a C-splint or Sam splint
- First aid field guide book: In case a serious injury or ailment occurs and you don’t know what to do.
- Epi-Pen: If you have a known allergic reaction.
- Personal medications: Bring any meds you take everyday as well as ones you take for flareups of pre-existing conditions. For example, if you are prone to kidney stones or gallbladder issues, bring these meds just in case.
- Items for babies and children: When I took my baby camping, I brought along a lot of other items. You can see that checklist here.
Backpacking First Aid Kit Tips
- It’s really annoying to pack a first aid kit before each trip. To save time, I keep this kit packed and stored with my other backpacking gear. If any item was used during a backpacking trip, I restock it before putting the kit away so the kit is always ready to go.
- Always have an exit plan. Broken bones, crushing falls, bear attacks… If you are seriously injured, how would you get to help? I suggest getting an emergency communication device, like the SPOT finder. These use GPS coordinates to track your position. With the push of a button, you can send a distress call to Mountain Rescue.
- Take a wilderness first aid course. Mountaineering clubs and outlets like REI sometimes have these. It’s very different than a standard first aid course.
- Saving weight: Don’t obsess so much about saving weight in your pack that you end up not bringing crucial items. If you need to shave a few ounces, bring smaller tubes of cream. If you must omit something, then skip the Ace bandage and triangle bandage.
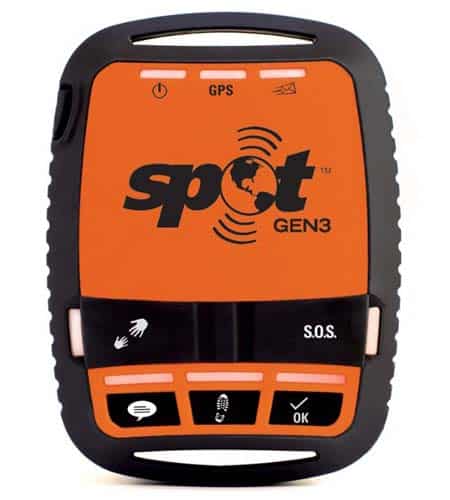
The SPOT satellite messenger can be used to send a message for help, regardless of where you are. .
Buying Reliable First Aid Supplies
You can make your life easier by buying pre-made first aid kits. Just be warned that most of these cheap kits contain crappy, useless items. Like the cheap Chinese-made first aid kit I got which had medical tape which wouldn’t stick and scissors which wouldn’t cut. In the end, I just used the bag and filled it with my own items.
If you want a pre-made first aid kit, I can recommend the three listed below:
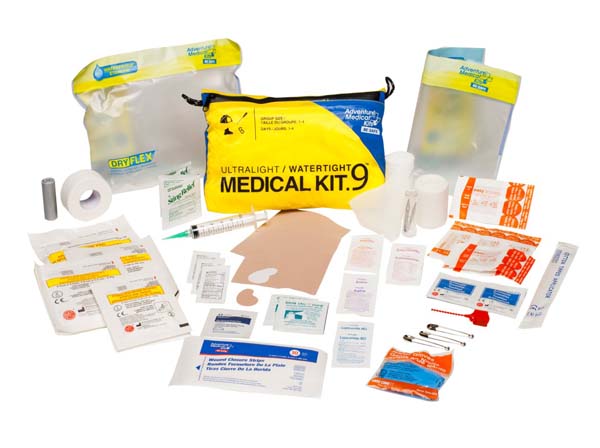
Adventure Medical Kits Ultralight and Watertight:
Weighs 7.2oz an contains almost everything I have on my list. The bag is waterproof, so good for bad weather or trips where you could possibly fall into a stream. 😉
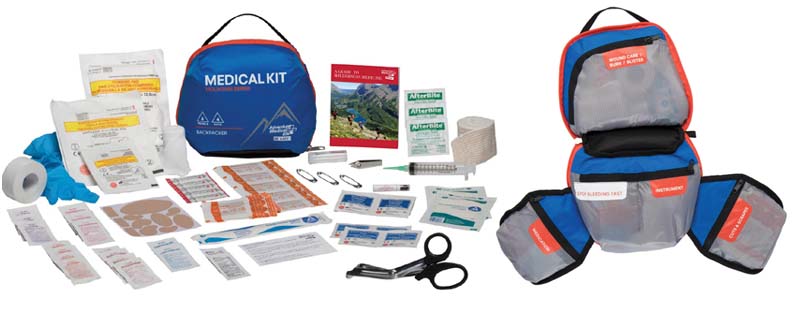
Mountain Series Backpacker Medical Kit:
Also by Adventure Medical Kits, this one is heavier at 13.6oz. However, it has a cool water-resistant bag which opens up into compartments so you can keep gear organized. You could cut weight by removing duplicates of some items and removing the guidebook.
This is a large first aid kit with a lot of quality items in it. It’s meant for car camping, travel, boats, or for at-home. But there is also a mini pouch which can be removed for backpacking trips.

Pin this!


1 Comment
Greg
August 20, 2023 at 3:24 pmThanks for the pack list and information for a light 1st/Aid kit. Cheers1